Without further adieu, lets get to the game. Black is Shusaku and his opponent is 3 dan. There is no komi as was traditional at the time.
Figure 1
 1-20
1-20

The fuseki is of note because of 4 and 5 which are both played away from the corner. Shusaku tends to play a tight, territory oriented, opening in these early games and seems happy to take the corner with 7 and 9. White 6 might seem a little sub-optimal, giving black a large corner and leaving the white formation open at the bottom but I think that 6,8 and 10 work well with white 20, giving white a large formation facing the center. When black approaches at 11 white pincers at 12, one space closer than is often played. This crowds black a little more and black plays an easy variation that settles his stones quickly. This allows black to turn to the bottom right and approach at 19 which prevents white from playing at the same point which creates a nice shape across the lower side. White's formation across the bottom is his chief asset in this game as black has taken a position in all four corners.
Figure 2
 21-39
21-39
White forces at 40 before turning to the fight at hand. Through 48 white moves into the center and gets to jump into the potential black territory at 46. After black 49, though, white has to turn and reinforce his other group at 50. This gives black the chance to counter in the center. With 51 he seals white in and develops his two stones at 45 and P11. White shows no fear and cuts with 56 and 58 while black connects with 59. White continues to develop his cutting stones with 60. Black jumps out to 61 and white peeps at 62. Often a peep is proper kikashi, a forcing move, but in this case the situation is a little more complicated. Certainly if white pushes through at O11 he enlarges his side and no longer has even the faintest worry for his group in the upper right. On the other hand the center is the crux of the game right now, not the right side. The relative strength between the 56-60 white group and black's central group at 45, 61, etc is the urgent situation on the board right now. It is good to get in the habit of questioning your opponents peeps. You will often find that the consequences of the cut are small enough that you can ignore or somehow resist the peep.


The exchange in the lower right is typical of opening on the 5-4 point (Q5 in this case). White gets influence and black gets secure territory. Black 29 looks small but concerns the base of both the black and white stones, white would also make a base by playing here and then black would like to extend to C13 but because of white's stone at C12 he would have to play at D14 to make shape. No matter how you cut it black's shape looks cramped. After 29 Black is unconditionally alive and doesn't have to worry about his stones in this corner. Whites stones, however, are somewhat weakened. After 29 a black pincer against the C12 stone would be severe so white makes a two space extension to 30 to establish a base. Black exchanges 31 for 32 before confronting white at 33. This move combines well with 29 and when white ignores this again to play 34 black forces at 35 before reinforcing his corner at 37. I'm a little doubtful of 35 actually. It doesn't seem necessary as black's group in the corner is already alive and the extra stone at 35 doesn't really add much pressure to the two white stones below. In fact this two space extension makes building influence across the left side uninteresting. I would rather keep the aji around G18 intact and simply reinforce at 37 directly.
Speaking of 37, this is the key point in the corner in this formation and if black neglects it white will gladly play there, pressing black down and playing on a grand scale in the center. Imagine a white stone here: This would be a good result for white. Even though black has all four corners all of white's stones are working together to form central influence. Black 37 is also big along the top, forming a good formation with 33 and P17. Finally black 37 prevents or limits white's probing moves in the corner. These are a little beyond the scope of the commentary here but white has numerous probes to use against the small knights enclosure, you can explore some of the possibilities of white playing at P18 or R17 among others, particularly before black reinforces at 37. White builds a moyo with 38 and black begins to reduce white's central influence with 39. The crux of this game is whether white can get a big center. Black has good positions in all four corners so the center is the only place for white to catch up in territory.
Speaking of 37, this is the key point in the corner in this formation and if black neglects it white will gladly play there, pressing black down and playing on a grand scale in the center. Imagine a white stone here: This would be a good result for white. Even though black has all four corners all of white's stones are working together to form central influence. Black 37 is also big along the top, forming a good formation with 33 and P17. Finally black 37 prevents or limits white's probing moves in the corner. These are a little beyond the scope of the commentary here but white has numerous probes to use against the small knights enclosure, you can explore some of the possibilities of white playing at P18 or R17 among others, particularly before black reinforces at 37. White builds a moyo with 38 and black begins to reduce white's central influence with 39. The crux of this game is whether white can get a big center. Black has good positions in all four corners so the center is the only place for white to catch up in territory.
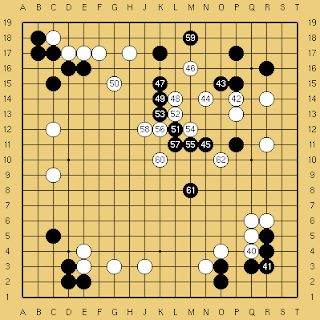
Figure 3
40-62
White forces at 40 before turning to the fight at hand. Through 48 white moves into the center and gets to jump into the potential black territory at 46. After black 49, though, white has to turn and reinforce his other group at 50. This gives black the chance to counter in the center. With 51 he seals white in and develops his two stones at 45 and P11. White shows no fear and cuts with 56 and 58 while black connects with 59. White continues to develop his cutting stones with 60. Black jumps out to 61 and white peeps at 62. Often a peep is proper kikashi, a forcing move, but in this case the situation is a little more complicated. Certainly if white pushes through at O11 he enlarges his side and no longer has even the faintest worry for his group in the upper right. On the other hand the center is the crux of the game right now, not the right side. The relative strength between the 56-60 white group and black's central group at 45, 61, etc is the urgent situation on the board right now. It is good to get in the habit of questioning your opponents peeps. You will often find that the consequences of the cut are small enough that you can ignore or somehow resist the peep.
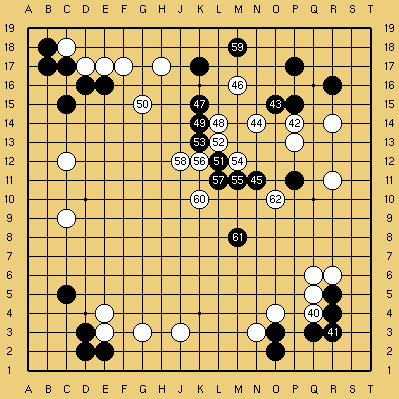
Figure 4

63-75
Black ignores the white peep to connect at 63. White makes a very dubious second peep at 64 and black counterattacks by pushing at 65 and cutting with 67 and 69. Here black sacrifices two stones to play 71 and then connect at 73 in sente. After white plays at 74 black comes back and connects at 75. It may be a subtle point but kikashi should be light and after black plays 63, 71 and 73 these stones seem a little heavy, nearly engulfed by a very thick black position. It will be hard to pull out these two stones and also protect the potential territory on the right side. Also black's two stones at 67 and 69 are still working well and preventing white from putting too much pressure on black from the other side. Since it seems doubtful that black's large group in the center will be captured it seems very hard to see white making much territory here. From this we can conclude that the game is better for black who already has all four corners. We'll see more fighting in the center when we wrap this game up in the next post. Thanks for following along! I hope you enjoyed this review.
No comments:
Post a Comment