Hi Readers, I've been taking a break for the last week after finals and not working on anything at all so thats why there haven't been any new reviews but I'm getting restless and have a few more things that I'm getting ready for the site. In the meantime I recommend that you check out this awesome seki tutorial from a Chinese manual dating from the 1600s courtesy of Go Game Guru.
So next time I'm going to do a fairly modern game from a decade ago from a Korean tournament that I'm sure you will all enjoy. Then we'll go back to Shusaku games and maybe I'll even flesh out the other areas of the site like the fuseki study and problems sections. We'll see how it goes. Bye!
Friday, December 17, 2010
Monday, November 15, 2010
Shusaku Game 7 - Full Game Review
Alright, this game is so exciting that I had to do the whole thing in one large post. There is a lot of complicated middle game fighting and some interesting joseki sequence including a defunct variation of the taisha joseki. This joseki, known as the 'Great Slant' is famous for being a joseki of several hundred variations. It is as complicated as the 'Avalanche' joseki and even professionals have occasionally made mistakes in playing it out. It is telling of his amazing strength that Shusaku exhibited at an early age that here, playing against a 5 dan opponent, he takes only 2 stones. This is also the first game from 1841, the previous six were from 1840. Shusaku was born in 1829 so he would be turning 12 sometime in the year from which this game record is from. There was no komi as was standard at the time.


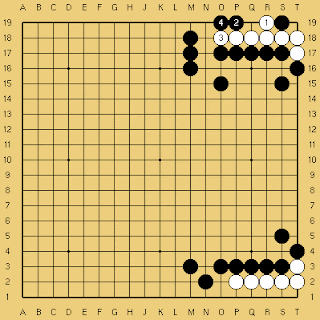
Fig. 1

1-16
A Questionable Invasion - White jumps into the corner right away which gives black a thick position on the outside through 12. Black 10 is played to build influence. The joseki move is for white to play 11 at F2 but 11 is also seen in pro games. Note that the black hane at D6, which is standard in many variations of the corner variation, would be redundant here given the thickness of black's wall. After white takes sente to occupy the lower right corner with 13 black establishes a position in the upper left at 14. This is a great move in terms of how it relates to the wall in the lower left because it extends to the absolute maximum distance possible while still having room to make another move up the side at D17. White plays 15 without hesitation because if black plays here fully 3/4 of the board fall under his influence. Imagine if, instead of 15 white enclosed the lower right corner and black plays at 15. Already you can see that the white invasion in the lower left feels premature. After 15 black plays 16 to initiate the taisha joseki. This joseki has many complicated continuations but in the most severe fighting variations the fight will move down the left side towards black's thick wall so it seems a good choice for black in this position.
Fig. 2

17-25
A Defunct Variation - The moves up through 24 are consistent with the modern joseki but 25 is a mistake. I did some research and this variation is played up through about 1880 and then completely disappears from high level play except for one game I found in 1970. I suspect that there is a specific refutation of this move but it seems that the outside is more important at this juncture. The modern move is to play 25 at F17 after which black can play a variety of moves. I played out several variations from this move and it does seem that black has the advantage in the fighting that ensues after this move. It is possible that simply connecting at F15 would be enough since the white hane at 25 is not as urgent as playing F17. Certainly, however, there are certainly other options and I think pressing at F17 directly also leads to a good result. I think that the sequence played in the game, starting with white 17, is an older joseki because the pattern up to white 27 is common in the 1800s.
Fig. 3

26-41
The Taisha! - As you can see the variations of the taisha, as each side seeks to stabilize their two groups, grow quite quickly. The exchange of 26 for 27 was standard at the time of the game which is why I think a move other than 26 might give black some advantage. When black pushes on the outside with 28 white turns at 29 which threatens the corner, forcing black to capture a white stone with 30. Now white has to turn to the stones on the top and connect them to the outside with 31 so black gets to extend on the outside at 32. White takes advantage of black's shape by playing a hane at 33 before jumping out with 35. Black piles on the pressure with 36 and white slips in the atari at 37, forcing black to remove a white stone by capturing at 38. White makes eye shape with 39 (note how 37 is necessary to prevent a black atari at A15, which would ruin white's eye shape) and black follows suit with 40 in the corner. When white jumps out at 41 the action on the left side comes to a halt but black has sente and the black group in the center and the white group on the top are both weak.
Fig. 4

42-57
Pressing White - Black jumps ahead of white with 42. It is always imperative to get ahead of your opponent in a pushing battle. White thrusts at 43 and then pushes at 45. When white captures at 47 black falls back to 48. Now white jumps ahead of black with 49 and black plays a keima to get in front of white at 50. White makes a two point jump to leap still further ahead of black with 51. This sequence perfectly illustrates the need to get ahead of one's opponent in a pushing battle like this. The down side of the two point jump is that it leaves weakness behind and black takes advantage of this with 52. Through 57 black builds thickness in sente. At this point the game looks very good for black as white has very little secure territory and black's stones dominate the center.
Fig. 5

58-78
Developing on Both Sides - Black approaches in the lower right and white makes a three space pincer at 59. Black immediately attaches at settles his stones rapidly through 64. The joseki move would be to play at 73 but that would leave the stone at 59 open to a pincer from the star point stone in the upper right. While playing 65 gives white a position on the right side it allows black to attack the lower right corner. The attack at 66 is magnificent. A more orthodox play would be to play at 73 directly but with the outward oriented positions above and to the left a play like 66, inviting white to stoop to the second line for safety, is perfect. It also foresees the eventual turn at 69 and is well placed to contain white to the side. With all of black's influence white cannot make up the difference with 2nd line territory so the goal of this attack is to confine white and make sure that these stones live with little territory. Though white creates some space and threatens to escape to the outside through 77, black 78 puts his eye shape into question and secures a base for the black stones. Black continues to do well in this game, the 4 stone wall from 68-76 is well placed to build territory with the thick formation to the left and the stones in the corner are secure and are well positioned to keep white from connecting 77 to the two space extension on the right. White has sente and must be looking for a way to equalize. Shusaku has played an excellent game so far by emphasizing the center and giving no quarter.
Fig. 6

79-88
Reducing Black's Influence - White decides that reducing black's influence is of primary importance. To this end white extends out at 79. In and of itself this is a pretty move, turning two fairly weak stones, at C6 and C10, into a nice balanced framework aiming directly at the center area dominated by black. Shusaku apparently understands that using influence to directly make territory is a fools game and instead of protecting his potential territory in the center he makes a powerful hane at 80 which forces white to make an empty triangle at 81. Truthfully white should have played around 80 (playing P7 is one idea since it cramps black's shape) instead of tenuki. Not content black picks another fight on the right side by attaching at 82. White hanes but after the black counter hane at 84 plays tenuki again to peep at 85. This again reduces black's central influence but white is leaving a great many weaknesses in his wake. After 87 black feels that a prudent move to ensure life on the bottom is in order and blocks at 88. This is a good example of honte, or honest play, a solid reinforcement. It is never good to have weaknesses cluttering up the board, restricting future action and since black has a solid position throughout it would be foolish to let white start an attack now.
Fig. 7

89-104
Thrust and Parry - White continues on the right with a cut at 89 and through 93 gets good shape on the side at the cost black capturing a stone in a ladder with 94. This also cuts the original white formation in half. When white cuts at 95 black prudently finishes the ladder with 96. It is almost always a mistake to leave an important ladder hanging, even though 95 wasn't a ladder break if we look just a few moves ahead 99 would be. White plays a tesuji at 97 which makes black's hane at 98 a bit awkward since after white extends at 99 black has to come back and connect at 100. When white plays 1 black must give way again at 2. This gives white the opportunity to capture the cutting stone at O7 in a net by playing at 4 but, instead, white plays an extension at 3 in the upper left. I'm not sure about the logic of this last white move as it doesn't seem very urgent. If black were to play here white could easily live with a modest corner by jumping into the 3-3 point. Whatever the reasons the black extension at 4 is severe.
Fig. 8

105-127
Chaos! A Complicated Fight - White has few options and 5 is one of the most aggressive. Black has read out the variations and hanes with 6 which is also a very aggressive move. Since black has the advantage in influence it behooves him to attack. The sequence to 13 is forced and then black ataris at 14, forcing white 15, before pushing again at 16. Here white take time to jump to 17, indirectly capturing 14 and threating the five black stones on the right. Black is forced to jump to safety with 18 which gives white time to go back and answer black's push in the center with 19. Black extends again with but white switches back to the right side and cuts with 21. Black noses in with 22 and white blocks with 23. Black activates his other cutting stone by pushing up with 24 and when white extends in the center with 25 black ataris at 26 and white connects with 27. The white position is fairly precarious with the group on the right side having but one eye and four stones floating in the center, although with the cutting point at M11 white still has some aji. I also wonder if you've noticed the weak point at O2? White needs another move to secure eye space on the bottom and it is looking doubtful that white can find the time to defend.
Fig. 9

128-144
Black extends again in the center with 28 and white saves his right side group by cutting at 29. Through 35 white secures a second eye but loses sente. Black seals the large white group in with 36, this combined with 28 mean that white cannot connect out, as an added bonus 36 makes the black group on the bottom unconditionally alive. White peeps with 37 but black astutely ignores this and goes for bigger fish by making the placement at 38. If black can kill this white group then it won't matter that white follows up with E4 and captures four black stones. With 38 through 44 black ravages white's eye space. I'm somewhat dubious of 39, I would think about playing at 43 or 44 directly after 38. As it stands in the game this white group isn't even assured of a single eye at this point.
Fig. 10

145-165
59 at 54
White Counterattacks - Starting at 45 white threatens to link up with forces on the outside but black 46 quashes any such ambition. With the game on the line white attempts to capture the black group floating in the center. Through 59 white cuts off the black center but black gets an excellent squeezing tesuji with 54 that allows him to connect at 58 in sente. After white connects at 59 black hanes at 60 which is severe. White keeps pushing with 61 and 63 and then jumps to 65. I like the jump to 65, personally, it seems a stylish move, making the black stone at D11 less relevant, extending from the safe position on the left to the floating group in the center. Still it seems that white is in a precarious position with its large group in the lower right without eyes and the black group in the center in an even dual with another weak white group.
Fig. 11

166-194
A Last Ditch Plan - Black strikes directly by cutting at 66, white defends at 67. Now black jumps to 68 to increase liberties for the upcoming capturing race between his large central group and the large white group in the lower right. White connects underneath with 69 and 71, necessary to continue threatening the large black dragon but after 71 black delivers the deathblow with 72, robbing white of any chance to make eyes or increase liberties. Looking at the board, and probably completely surprised by this young Go playing prodigy, white settles on one last attack. The black stones along the top center have been weakened by the white development in the center during the fighting. If white can capture all these stones then victory would be in reach. To this end white plays 73 to 79 in the upper right to further isolate the black group. Unfortunately black cuts through at 80 and secures life easily through 94 whereupon white resigned.
I hope you enjoyed this game review, I really liked this game and am glad I got to slip another review in before I get swamped by the big run up to finals week in school. Bye everyone.
I hope you enjoyed this game review, I really liked this game and am glad I got to slip another review in before I get swamped by the big run up to finals week in school. Bye everyone.
Thursday, November 11, 2010
Shusaku Game 6 Part 2
Again, I'm in school now so these posts are going to be few and far between, finals are in one month though and then I'll have a bit of free time again. If you're just getting here you might want to start at the first half of the review. And now, the thrilling conclusion to our latest Shusaku game.


Fig 1

101-129
Remember that black just captured a ko at M15 so white looks to reinforce the stones on top with 1. Black takes the opportunity to seal off the bottom with 2 which, after the forcing move at 3, causes White to invade the corner at 5. Black responds by blocking on the wider side with 6 but then plays a non-joseki move at 8. I did a little research and this is valid when black either highly values the right side or has a lot of supporting stones in the area. In fact it was played by Ishida Akira 9p as white against Takemiya Masaki 9p in the 1995 Tengen tournament in Japan and white went on to win by 2.5 points, you can review the game on Eidogo if you want. It also is hard for white to live in sente against black 8. Notice that after 9 and 11 black could have ignored these to jump in at B2 and do great harm to the potential for White to make eyes locally. If the 3 black stones at C8 were stronger this might have been a viable strategy. After white descends at 13 black turns to the weak group at the top and looks to take profit while destroying White's eye space. Unfortunately white moves out smartly and while black does take a large corner there is still a sense of the stones on the top, both the top center and the upper right corner, being over concentrated. Finally white connects at 29 to secure access to the center.
Fig. 2

130-151
Black strikes at the white group on the bottom with 30 before turning back to lash out at white's group which is safe enough to let white play 33 before connecting to the right through 39. Now black turns to the center with 40 and after building a little thickness with 41 and 43 before jumping into black's territory with 45. Adding in the hane at 47 and at 51 it seems that white has pulled fairly close to even on the board. Certainly black has not gotten much territory in the lower left after building such a large framework earlier in the game. I think white has done well at seizing the initiative so far.
Fig. 3

52-79
Most of these moves are pretty clear, black defends his territory on the bottom with 52 and white creates some aji with 53. Black plays a series of sente sequences starting with 56 and 58 on the right and then playing the large hane at 60 on the left. After forcing a bit more through 66 black turns to the bottom to make a capture with 68 and 70. Now white plays at 71 to prevent black from taking the corner and notice how 76 and 78 work to create a shortage of liberties in the corner for white. White can''t block at T2 with 79 because he would put himself in atari. This is a nifty sequence that eats away at white's territory on the bottom. After 78 white turns back to block at 79 which is necessary to prevent the ko that black could create by playing at 79 (white pays O1 and black can create a false eye by playing at P3).
Fig. 4

80-210
Black secures his territory on the bottom with 80 and white responds by cutting through the center with 81. A small fight starts and with 88 and 90 black decides to expand the bottom rather than try to salvage some territory in the central area. White makes time to make the large hane at the top with 91. Black turns to the lower left with an atari at 92 to which white defends with 93 forcing black to connect at 94. Taking sente white builds a bamboo joint in the center with 95 and proceeds to force black through to 203 (3 on the diagram) before turning to defend the lower left at 5. Black makes the sente endgame hane at 6 and because of the bad aji in his shape white has to make eyeshape at 9 which lets black turn at 10 in the lower right. The game is very close at this point and only small endgame moves remain.
Fig. 5

211-245
The final push for both sides is here. This takes us through to the end of the game record and while there are still a few moves to be made around H18 the game is almost over at this point. The record indicates that white won by a single point which gives him revenge on Shusaku for their last game which went the other way by the same minuscule margin. Thanks for reading and I hope you enjoyed the game.
Saturday, October 23, 2010
Shusaku Game 6
A quick apology for the lack of recent updates, school started so less free time for me. Its sad but I will survive. Without further adieu here is game 6 in our Shusaku series. This game was played in 1840 against a stronger 7 Dan player, Shusaku is still a Shodan at the time of this game. Shusaku takes three stones as black and there is no komi.


Fig. 1

1-20
An Interesting Joseki - The attachment at 4 is not a commonly played but the pattern up to 11 are joseki. Traditionally black would either play at F17 or played directly at 16 but Shusaku attaches at 12 and makes a hanging connection before playing 16. This works well for him in the corner, without exchanging 12 and 14 for 13 and 15 white would have responded to 16 (the joseki move) by playing at C16 and taking the corner, but it hurts his two stones on the top. Before 14 black would have had the push at F17 and his top stones would be more secure. White wastes no time in striking at black's thinness by first pincering on the top with 17 and then playing 19 and threatening to undo the work of black 12 and 14. Black ignores 19 to press with 20 which gives him a nice position along the top. White's stones are fairly settled in the corner and black's left side group is precariously perched. Just as a quick question do you know how black should reply to 19 once he comes back to the local situation? Would you connect at C16? What about creating a ko shape at B16? One of these is a terrible move and the other is very good, do you know which is which?
Figure 2

21-36
29 takes ko
An Early Ko - White tries to make a position at the top and manages to get a decent group established in exchange for making the black group thick. This is an excellent sequence for white as black's stones are clearly overconcentrated on the top while white's shape is very light and hard to attack. Having to give way at 30 is submissive but there are no ko threats in the opening and allowing white to capture here would make him thick on the top would amount to an utter collapse for black. White makes a fast paced second high kakari at 33 after ignoring the black pincer at 32. Black takes the corner in the upper right at 34, this move guarantees black life in the corner as well, and white approaches at 35, another fast paced move. Black turns his attention to his weak group in the top left and reinforces at 36 which makes the pincer at 32 a little more relevant. I think that the pincer at 32 is questionable as the black group on the upper left, particularly before 36, is very weak and it is hard to attack when both sides in the fight have a weak group to take care of. Also, imagine that these three white stones and the black group above both move out into the center. The black stones will face the settled position at the top and the white stones will be hovering over the open area at the bottom of the board, obviously a more important future area.
Figure 3

37-49
A Second Double Kakari - White captures at 37 because letting black play here would threaten the cut at B18, protect against white's cut at D13, and almost certainly assure black of two eyes which makes the situation of white's three stones on the left entirely different. If the black group above has two eyes then black won't have to run out with it and can chase the white stones from his position in the lower left and now it is black that will build a wall facing the bottom of the board. Black takes a huge point at 38, separating white's top from the right side which prompts white to reinforce somewhat at 39. After black responds at 40 (a white move here would be a disaster in the center for black, entirely changing the balance of influence) white makes another double kakari at 41. Letting white make two double kakaris is usually not recommended in a three stone game but young Shusaku's fuseki (opening) is the weakest part of his game, although remember he is only 11 at the time of this game. Black plays an attach and extend joseki. White's extension to 49 is well placed since it coordinates well with the single white stone further up the right side, white could have played at R9 instead but this would not be an extension from the top as well as the bottom even though it protects the cut at R7 better.
Figure 4

50-70
White 55, 61 at K16
Black 58 at L16
Slow Motion Ko - Black starts by taking aim at white's position up top with 50. White makes a threat at 51 and after skipping to 53 (black cannot ignore this because a white hanging connection at 54 would destroy black's influence in the lower left) turns back to retake the ko with 55. Black makes another threat on the left with 56 and after white defends, and note how nice white's shape is, with 57 black retakes the ko with 58. This repeats with white threatening a large scale capture by playing at 59 and black defending before white takes the ko with 61. When black plays at 62 the ko fight stops for a while because any of these moves along the bottom are worth much more than the value of the ko. The entirety of the lower side might rest on this sequence and once 62 is on the table the ko fight on the top becomes uninteresting. White ensures connection to the center before jumping into the corner in a quest for eye space with 69. Now black takes aim at the poor aji in the white formation on the right by cutting at 70.
Figure 5

70-91
Using Aji - Black sacrifices two stones and so as to play 74 and 76 in sente. This paves the road for the sharp combination of 80 and 82, cutting off the white stones from the center. White manages to make a base but while white is making eyes with 87 and 89 black gets magnificent outer thickness with 88 and 90. White has some compensation in cutting at 91 but, as we shall see, Shusaku has a plan to deal with this cut. I think that 79 is somewhat dubious since black can cut so efficiently at 82. I think that a push up to 80 would have worked better. If black hanes at 80 in response a cut at 88 feels better than where 79 and 81 end up in the game.
Figure 6

92-100
99 at C13
A Bold Plan - Shusaku plays a shrewd series to force a ko in the upper left by playing atari at 92, creating eye shape at 94 and initiating ko at 96. As soon as white takes at 97 he takes the ko on the top. White can't win both the top and left hand ko so has little choice but to fill at C13 with 99 and let black take the top with 100 which.greatly weakens, but does not directly kill, the white stones scattered around here. This is a trade in white's favor but black now has no weak groups, perhaps a parity of territory and a huge lead in influence so despite the loss in the upper left the game still seems good for black. Next time we'll go through the rest of the game and see what happens in the middle game fighting and whether black gets to close the lower left corner or make anything of his moyo. Also important is whether black gets to invade on the right or if white makes shape by playing at at R14.
You can read the rest of the game review in part 2.
You can read the rest of the game review in part 2.
Sunday, September 19, 2010
Shusaku Game 5 - Part 3
Are you ready for a riveting finale? This is a good game and it is about to get very complicated so lets dive in. As always you may want to start at the beginning if you're just getting here or go to Part 2 of the game review. Shusaku is black and has taken 3 stones against his opponent.


White continues threatening the other black eye while black keeps threatening the stones up top. The the value of 4 is greater than 10 which is why white keeps resisting for an extra move after 4. When black plays 10 white finishes off the ko, and the large black group, on the bottom. This allows black to wedge at 12 and capture the white stones along the top. While this is not as big as black's capture black also had to give up the lower right corner to set up the attack in the lower left. The value of the lower right and top is very close to the value of the large black group in the lower left. It is rare to see so many large scale captures but this is a particularly violent game.


Figure 1

154 - 176
White just played the stone at B12 which is a very large point but it leaves some serious flaws in white's shape in the lower right. Black starts his attack at 54 using a hane to reduce white's eye space. Using the aji of the stone at P7 he plays a very sharp sequence that threatens to kill the corner through 68. The price of this is the capture at 69 which black blocks at 70 but then, after exchanging 71 for 72 white initiates a ko with 73. If white can escape and get a couple of extra liberties he can kill the three stones at 60, 64 and 66 so the ko is very urgent for both sides. White 71 is actually another incredibly sharp move because without it black would have the option of crawling along the first line with 70 and linking up with the stone at K2. While this is a fairly crude way of playing it does kill the corner with almost no compensation for white. Black takes the ko and then white makes his best ko threat at 75. Black ignores this threat and captures the corner group with 76. Black has seemingly scored a major success but the threat at 75 is incredibly severe, putting the life of the large black group in the lower left into doubt.
Figure 2

177 - 200
189 at 84
191, 194, 197, 200 Take Ko
White follows up on his threat with 77 and Shusaku strikes at the corner first pushing at 78 and then striking underneath with 80. This allows him to set up a second eye (the first is at E4) via a ko through 90. White captures the ko and black starts with a local threat at 92 which would allow him to connect to the outside. White makes an internal theat of his own and plays 95, aiming at black's other eye. Black has to respond and with 97 white retakes the ko. Black turns to the wealth of ko threats he has against the large line of white stones along the top. Finally black retakes the ko with 200.
Figure 3

201 - 212
3, 6, 9 Take Ko
11 Fills Ko at D2
White continues threatening the other black eye while black keeps threatening the stones up top. The the value of 4 is greater than 10 which is why white keeps resisting for an extra move after 4. When black plays 10 white finishes off the ko, and the large black group, on the bottom. This allows black to wedge at 12 and capture the white stones along the top. While this is not as big as black's capture black also had to give up the lower right corner to set up the attack in the lower left. The value of the lower right and top is very close to the value of the large black group in the lower left. It is rare to see so many large scale captures but this is a particularly violent game.
Figure 4

213 - 233
White starts with some sente reducing moves with 13 through 23. Sente profit taken he plays the largest point available at 25. Black does the same by taking the large gote point at 26. Large at this stage of the endgame is fairly relative as 25 and 26 are worth only about 3 or 4 points. This gives white the chance to play some more forcing moves with 27 through 31. If white had played 27 etc. before stopping to play 25 black might have played around 25 himself instead of answering 27. This game is very close so both players are battling over every point. Finally white makes a gote play at 33 to secure a handful of points on the right side.
Figure 5

234 - 271
This is the rest of the endgame. Shusaku makes some sente plays of his own with 34, 36 and 38 before connecting with 40. White pushes with 41 and then captures a stone in the upper left center with 43. You know the game is almost over when players are making two point gote plays. Black makes some sente moves with 44 in the lower right and then 46 (which threatens a follow up at 47 which is why white defends) and 48 on the left side before defending his center area with 50. We have another series of small reductions with white 51, 53, and then the capture at 55 which black has to respond to or white will enclose another point by playing at 56 himself. From that position further reductions are possible at N1, O1, etc. so black wisely plays 56 right away. From here both players are pretty much grinding out one point plays all over the board.
Finally black plays at 70, reducing white's potential territory by one point and white defends at 71. The game is over and black leads by a single point. Truly a difficult game but the most amazing thing is that this is the work of an eleven year old in 1840. Today there are many young players with terrifying strength but this boy had no access to Go Academies like there are today throughout Japan, China and Korea let alone the wealth of modern analysis that has happened in the last 70 years since the shin-fuseki movement started by Go Seigen and Kitani Minoru. Anyway, I hope you enjoyed this game review, keep practicing and have fun!
Finally black plays at 70, reducing white's potential territory by one point and white defends at 71. The game is over and black leads by a single point. Truly a difficult game but the most amazing thing is that this is the work of an eleven year old in 1840. Today there are many young players with terrifying strength but this boy had no access to Go Academies like there are today throughout Japan, China and Korea let alone the wealth of modern analysis that has happened in the last 70 years since the shin-fuseki movement started by Go Seigen and Kitani Minoru. Anyway, I hope you enjoyed this game review, keep practicing and have fun!
Monday, September 13, 2010
Shusaku Game 5 - Part 2
If you missed the first installment and want to catch up go right ahead, we'll still be here, ready? Awesome, lets get going. Shusaku is playing black and this game is from 1840 when Shusaku was ten or eleven. In this game he takes three stones. Throughout this post I keep track of the score so this would be a good opportunity to practice your counting as well. While my own method is by no ways perfect it allows me to keep a fairly precise idea of established territory. This can be useful as if you are behind by more than ten points it usually helps to attack while if you are ahead by ten points you can be happy with simplifying the game.

Figure 1


106 - 126
Black puts his strength to use by invading at 6. White responds by holding down with 7 and building outside strength. Black continues to harass white on the outside and then switches to 26 which robs white's large group of its second eye. Black plays this because of the continuation that will be forced around the L8 point but this stratagem seems somewhat doubtful in that it is likely to weaken the large black group stretching out from the lower left in order to attack the floating white group up top.
There is very little certain territory but white here has about 6 points in both the lower left and upper right as well as about 10 points in the lower right. His group on the upper left side only has about five points of territory of if black gets to play A18 which is a huge endgame move for both sides. This gives white about 27 points of sure territory. Black, on the other hand, has perhaps five points of sure territory throughout the lower side plus five points in the upper left and another six on the upper right side. This makes for only 16 points. Black has a considerable advantage in influence however and will look to make up the difference by attacking. To be trailing so much in territory entering the middlegame is troubling but this is mostly because of Shusaku's mild fuseki. Black can make maybe 20 points in the center so his game is not bad yet. White must feel good with the situation being semi-equal after taking a three stone handicap.
Figure 2

127 - 153
White threatens to make another eye with 27 and when that is denied pushes out with 29. Here black gives way with 30 allowing white to connect at 31 which puts the black stones below in a precarious position. We see black's plan with 32 and the following harassment of the floating white stones though to white 43 which firmly establishes the connection to the secure white group below. Now both sides take some large points and black is canny in taking 44 instead of 45. Both these moves are large but if black plays at 45 and white plays at 44 white would have a good follow up move around G13 whereas there is no large scale continuation for white 45. This allows black to keep sente to block at 46 which creates some serious problems with white's shape in the lower right corner. After the quick sequence where black exchanges 48 and 50 for 49 and 51 black takes another large point with 52 and white follows suite at 53.
Now the territories are even more set so lets look at the score so far. Black has solidified his territory at the bottom right and now has about 10 points of sure territory, adding the eyes of the group on the lower left we can estimate about 13 points for the bottom. Black has expanded his territory at the top to about 14 points plus one for the eye at S13 makes 15. The big increase has come in the center where black has made about 16 points of sure territory and this might later swell to closer to 24 depending on the in game play. Total this and you have 44 total points for black.
White's lower right corner is in trouble so we might count two points for white at T4 and T5 but this is no longer solid territory for him. He has expanded the right side to 12 points so we can count 14 for him here. The upper right and lower left corners are still at 6 apiece for 12 total points here and there. This shows the value of counting early to get estimates, many situations don't change and if you already know that these two corners are a certain value you can rapidly make accurate estimates of the scores in your games. White has also expanded the upper left and now has about 13 points here. With the couple other small patches in the lower right center and the two spaces at B7 and C7 (which count double since they were captures) we can add another 7 points to white's total. That gives white a total of 44 as well. While my counting isn't the most accurate in the world (the lower right corner is actually worth 7 points, among other minor assumptions here and there) it shows how close this game is.
Hmmmm... This has turned into a sort of counting workshop so let us go over my technique for counting in a post soon. Next time see the thrilling conclusion of this very close game, till then, keep playing and have fun.
Continue on to Part 3
Continue on to Part 3
Sunday, September 12, 2010
Shusaku Game 5
This is a great game that was played down to the wire with both sides fighting till the very end. Finally the margin of victory comes down to a single point. This is another game from 1840 and Shusaku will be taking three stones as black against the same opponent both this game and the next.


Figure 1

Moves 1 - 26
Black plays thickly in the upper right but allows white to develop on both sides. When white siezes the whole board initiative with 15 and 17 one has the feeling that white is satisfied with his rapid development. With regards to 16 and 18 these were standard responses at the time. Since opening theory was centered around the 3-4 point the use of the handicap stones was not so well researched. The idea here is to rapidly make territory by making the large knights extension and then enclosing the corner at C4 or R4 respectively. The in game result, though, gives black an unacceptably low position on the bottom. 16 is questionable but not fundamentally wrong but 18 should absolutely be a one point jump to O4. This puts much more pressure on white 17 and balances out the low position of black 16.
White continues by invading the corner and living swiftly through 25. White 23 could be played at 24, black responds at R14, but after white defends in one way or another it is unlikely that black will respond, deciding instead to take sente and play elsewhere. Black gets magnificent thickness and seals white in on both sides but through 26 white still has sente.
Overall this opening is a good success for white. The 15-16 and 17-18 exchange favor white and black's play has been a little slow so far. This is typical of Shusaku's early childhood in general. In the middlegame we can see a deep reading ability that rivals any of his elder's. His opening play, in contrast, is incredibly mild. This is probably the result of not having played enough games to get a good feel for the openings. These games in particular were probably the first time young Torajiro was playing strong, established players. The difference in having played an extra several hundred games is invaluable. Despite the general success of white's quick opening play the three stone handicap is telling and Shusaku will soon show his teeth.
Figure 2

27 - 53
White makes a solid extension to 27 and finally black gets a chance to breath. Black invades at 28 and we can see how the modern one space jump would work better with 28 than the large knights extension at G3. Again the one point jump was rarely played in the 1840s so we can forgive black for following tradition. White invades a second corner with 29 and establishes a living shape through 37 before setting his outside stone in motion with 39. This may be a little premature for this sequence but in a three stone game white probably welcomed the opportunity to start a fight. White moves out smartly to 49, black seals white into the corner with 50 and then white responds to the jump to 52 with the shoulder hit at 53. I get the feeling that white is seeking complications even though black's position is fairly thick throughout the board. Black will have to watch to make sure his large group in the lower left doesn't come under attack during the large fight brewing in the center.
Personally I would like to ignore 53 and maybe make a splitting move around K5. This attacks both the solitary stone at 53 and the large white group above. Secondly it gives good eye making space with a follow up at K3. The main reason for ignoring the shoulder hit at 53 is that black has nothing to worry about another white move here. Against N4 black can fall back to O3 and against M3 white can push up to N4.
Figure 3

54 - 76
Black responds by pushing at 54 and when white jumps to 55 we see his intent to harass the large black group in the lower left. Black responds positively by breaking out with 56-64 and then linking under with 66 and 70. White tries to link up all his stones with 69 but after 71-75 black shows fighting spirit by cutting with 76. There are a lot of things to manage right now but the main point is connection. White has three groups of stones that are in danger. The first is the large dragon starting at A7 and stretching across half the board, the second is the floating group from 55-69 and the third is the weak group on the right side. If white can connect these stones together they will be safe but if black can isolate even one of them his game seems promising.
Figure 4

77 - 105
Note 1-5 = 101-105
White doesn't respond directly but instead plays 77. This resolves the situation for the weak group on the side as it is now unquestionably alive. It is large in territory as well given the follow up move at the 3-3 point. Shusaku plays at 78 to separate the other two white groups. After jumping to 79 white comes back with 81 to capture the cutting stone. Now white has settled two of his three weak groups so black will look to attack the remaining one.
This is indeed what happens through the next series of moves. Black has already played 80 so sealing in white with 82 is only natural. White expands his eyespace with 83 but black reduces it with 84. Black strikes at 90 to protect the cutting point at C10 and after black 92 white feels secure enough to play at the large point in the lower right. Granted, black could rob white of his second eye with a hane at A9 but with cutting points at both H9 and L9 black would not have a lot of confidence in the ensuing fight. Note that White can play at A9 to make certain life for his group but this would be gote and against three stones he has to leave weaknesses behind him and strike at black directly.
After white 95 black attacks the stones in the upper left. This is very astute since weakening these stones helps if white tries to cut through black's position at either of the aforementioned points. After white connects at 101 (1 in Figure 4) black makes a sente reduction on white's upper right corner. That concludes our review for now but I'd like you to look at the timing of black's last two moves. These are his sente, but if played too early white might sacrifice the corner and come out ahead in another area. Too late and white might hane at Q18. This is excellent timing and shows Shusaku's unearthly reading abilities at a young age (I believe he is eleven at the time of this game). Till next time, play hard, read well and, above all, have fun!
Basic Life and Death - Part 2
So last time we were looking at the lower right in this situation, remember that it is black to move in either corner and kill, and there were two tesujis that killed white. Go back and look at it if you want but in the upper left there is only one correct move for black to kill. I said before that only one of the tesujis would work but I lied a little, you need both eye stealing tesujis in the upper right but the order is important. Lets look at the problem again:


Reference Diagram

Black to Move and Kill
So we covered the lower right but what about the situation on the upper side? Black doesn't have quite as firm a grip on these stones so white might have some hope...
Figure 1 - Failure

Starting From the Outside
Black 7 at 3, if Black 7 at 8
White 3 makes a second eye.
Figure 2 - Solution

Starting From the Outside
Black 7 at 3, if Black 7 at 8
White 3 makes a second eye.
Black tries the eye stealing tesuji of 1 but hasn't bothered to read out the situation. Since the stone at M18 is one line further away than the stone at N2 this move is no longer correct.
Figure 2 - Solution

Starting From the Inside
Black 1 strikes at the vital point. After this there is no way for white to get two eyes. White can respond in a couple of ways but the strongest and most natural is to try to expand his eye space like this:
Figure 3 - White Expands

Black 8 at 6
White expands with 1 and threatens to make two eyes when he blocks with 3. Black simply adds another stone on the inside and white is left with a dead shape. White might alter the move order or try to escape up through 9 but there is no second eye here. White could also play at 4 immediately but then black 1 is enough. White could play 3 at 4 as well but that would just yield this variation:
Figure 4 - White Plays on the Inside

We already know that the 3-4 exchange produces only a false eye so again white has failed. The question then is what should white do with these stones? The answer is, for now, nothing. Perhaps in some future fighting white will get a chance to play at K18 and then execute the sequence in Figure 3, connecting his stones to the outside. White can also use this corner for several mid sized ko threats so these stones still have some aji left. Hope you liked the problems, I'm getting to work on the next Shusaku game review as well.
Thursday, September 9, 2010
Basic Life and Death
This is kyu material but I thought I'd go over some basic life and death. Look at this diagram and see if you can read out the solutions. Here is a hint: In the lower right there are two tesujis that work but in the upper left only one of these two will work. After the jump I'll have the two solutions to the lower right and next time we'll go over the situation in the upper left.

Problem Diagram

Black to Move and Kill in Either Corner
Note: There are two ways to kill the lower right
but only one to kill the upper right.
Please, lay this out on a board if you can't see the solution and practice your reading. There are only a few possible moves so this will be a good test. Alright, got it? Really? For sure, you know every variation? Ok... here we go!
Wednesday, September 8, 2010
Shusaku Game 4 - Part 2
Onto the second half of the the game. If you missed it here is part one. Shusaku is eleven at the time of this game and is playing black with a three stone handicap. The bulk of the second half of the game is a large ko fight that I'm going to break down into pretty small pieces so we can try to understand whats happening on the board. Here we go:


Figure 1

102-119
Black tries to escape at 4 and here we see the severity of white 99 (the stone at N10). The central white group gets a lot of strength pushing black around and when he pokes at 15 black has no time to connect at 19 but must use 16 and 18 to ensure safety for his large group. Losing these stones is a big setback but black still has the lead. Looking at how the game turned out it is easy to see that black should have played in the center rather than pressuring the white group in the upper left. Had black played at 4 directly with 96 (which was played at D11 to pressure the eye space of the stones on the left side) then the lead would still be solidly in Shusaku's hands. Once the three cutting stones are captured with 19 the pressure black built on the left is meaningless.
Figure 2

120-136
Black ataris with 20 and then white builds up the bottom in the sequence through 35. White looks to get a pretty decent amount of territory along the bottom which, if you look back to before this sequence, is impressive as white was fairly thin around here. With 36 black starts a ko fight that rages through the next 50 moves.
Figure 3

137-145
39, 42, 45 Take Ko
One thing to note is that white has a plethora of threats around 37 but black will be happy to take compensation in another part of the board so he has quite a few himself. This is the style of playing 40. Even if he loses the ko he just has to break up white territory somewhere to win.
Figure 4

146-154
48, 51, 54 Take Ko
Here we continue with black threatening to jump into white's territory while white threatens black's center left position. Even with all the ko threats around 49 this fight is very hard on white. He has to come out of this fight ahead or it will be almost impossible to stage an upset in the endgame. The 52, 53 exchange looks a little strange but black is aiming at the hane at Q14 while white is trying to keep the aji of reducing the corner alive while protecting against the hane. Black retakes with 54 and white will continue to threaten the center left.
Figure 5

155-169
57, 60, 69 Take Ko
When black retakes with 60 white threatens at 61 but when black connects at 62 white must block at 63 or black will play there and his center stones are suffering from a shortage of liberties. If black 63, white J11, black L13 and black has rescued his three stones. Shusaku seizes the opportunity and wedges at 64 in sente to reduce the center and then plays the extremely big point at 68. This lets white recapture the ko with 69 but more or less assures black of a small lead.
Figure 6

170-184
72, 75, 78 Take Ko
84 Fills Ko at O3
White keeps making threats but his position is so dire that even black 76, connecting in the upper right, serves as a ko threat, forcing white to play 77 to keep his territory intact. When white finally runs out of threats and plays 79 to enlarge his territory on the lower side black senses victory. After first playing the endgame sente moves at 80 and 82 he comes back to fill the ko with 84. Black has a small but insurmountable lead at this point and by connecting the ko he shows that he is confident that he can win with the current balance of territory. 80, for example, could have been saved as a ko threat and black might have tried to force white to settle for a less valuable move than 79 but 84 is good enough for the win.
Figure 5

185-202
189, 192, 195, 198, 201 Take Ko
Another ko fight develops in the upper left but when black simply gives way with 202 the game is pretty much over. The game record ends here but there are only a small handful of points to still be played. If you want to do a quick exercise try to find the biggest endgame move for white (bonus if you find the two biggest and identify which is larger and what order they should be played in). I'll have the answer after the jump. I hope you enjoyed this game even though the bulk of it was a ko fight. Have fun!
Tuesday, September 7, 2010
Shusaku Game 4
This is a classic game from Shusaku's youth. This game is also in Invincible: The Games of Shusaku so I was able to find out the name of his opponent. The year is 1940 and Shusaku takes 3 stones against Ito Shuwa 6 dan, the head Honinbo disciple. Shusaku is still very young (and, actually, if I keep going through this book in order he will continue to be very young for many more blog posts, maybe I'll switch it up and do a game from later in his life next time) and his style is not fully refined but his play is still very strong.


Figure 1

1-28
The large knight move was a standard response in handicap games at the time. In contemporary Go the one point jump is considered a more active way to play since it works with the star point stone to build influence. Black plays solidly up through 19 but his attachment at 20 is suspect. As a rule of thumb one shouldn’t attach to weak stones since it makes them stronger. The other problem with this sequence is how well white’s approach move at 5 coordinates with the finished shape. If there were a black stone at 5 instead then this would be a good sequence since a black stone here would be aimed squarely at the weak underbelly of the white formation. Finally black has to go back to connect with 28 which means white has settled his stones on the right side in sente without any effort on his own part.
Figure 2

29-51
White makes two approach moves in the upper left which is a standard handicap strategy to complicate the game. Black might have wanted to make a one point jump to 34 instead of pincering with 32. It is hard to argue with 32 as making an extension and a pincer is almost always a good idea. Black attaches at 34 to separate white’s stones. Why does Shusaku attach at 34 instead of attaching to the other white stone at 29? The answer is simple, as a rule of thumb, you should always attach to the stronger stone. The white stone on the upper side is already caught in a pincer while the stone on the left side has plenty of room to make an extension. Since the stone on the upper side is weaker black naturally attaches to the stronger stone on the left, making it and his own position stronger. This is also a basic example of a leaning attack. Black attaches to the stone on one side to build up strength for the forthcoming attack on the other.
When white makes his own attachment at 39 he still needs to extend down the left side to stabilize his stones, but by starting a fight on top with 39 and the crosscut of 41 he is aiming at pushing through at D15. If he can cut through successfully he won't need to extend down the side. Because of this cut black has to handle this situation very carefully. Since we’ve been talking about attachments a lot lets look at 39 some more. The black stone at K17 is very strong since it entrenched on the third line and is a two space extension from another stone. Strengthening such a stone hardly matters since black’s position is already so secure. Through 51 white first leans against blacks corner in the upper right and then wraps around black’s two stones in the center. We can see a fierce fight taking shape along the upper side.
Figure 3

52-78
The fight is very complicated but white slips slightly at 63. This move seems a bit slow and allows black to take sente and cut at 68 which is very severe. White has to scramble with three different weak groups floating on the upper side. With 77 he manages to link one group to the left, simultaneously sealing black into the corner. Black lives in the corner with 78 and now white turns back to the other two weak groups. Though the situation is very complicated black has done well during the fight, securing his stones in the corner and keeping the pressure on white.
Figure 4

79-101
Note: 1 = 101
This fight is tricky and up through 95 both sides play very strong moves. Shusaku slips with 96 which should be played to prevent a move like white 99 (probably at M10) which is very severe. With 96 black is looking to kill the large white group wrapped around the upper left corner. In Go it is usually inadvisable to attempt such large captures and instead opt for forcing your opponent to live small. In this particular case it will be hard to kill this group because the black corner is still somewhat precarious and white will be able to use that aji very effectively to get his own eyes. Since it is unlikely that this group can be killed 96 seems to be an overplay. White exchanges 97 for 98 and then strikes at 99 which is very severe. Now it seems that black will have to do some scrambling of his own. Black follows up 96 with 100 but it is hard to see much coming from this attack after white 101 (1 in Figure 4)
Next post we'll wrap this game up and maybe I can get some more problems up later today. Hope you enjoyed this so far.
Continue to Part 2
Continue to Part 2
Subscribe to:
Posts (Atom)