Reference Diagram
Black to Move and Kill
So we covered the lower right but what about the situation on the upper side? Black doesn't have quite as firm a grip on these stones so white might have some hope...
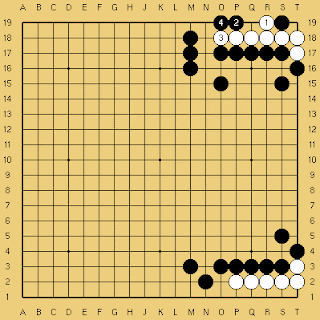
Figure 1 - Failure

Starting From the Outside
Black 7 at 3, if Black 7 at 8
White 3 makes a second eye.
Figure 2 - Solution

Starting From the Outside
Black 7 at 3, if Black 7 at 8
White 3 makes a second eye.
Black tries the eye stealing tesuji of 1 but hasn't bothered to read out the situation. Since the stone at M18 is one line further away than the stone at N2 this move is no longer correct.
Figure 2 - Solution
Starting From the Inside
Black 1 strikes at the vital point. After this there is no way for white to get two eyes. White can respond in a couple of ways but the strongest and most natural is to try to expand his eye space like this:
Figure 3 - White Expands
Black 8 at 6
White expands with 1 and threatens to make two eyes when he blocks with 3. Black simply adds another stone on the inside and white is left with a dead shape. White might alter the move order or try to escape up through 9 but there is no second eye here. White could also play at 4 immediately but then black 1 is enough. White could play 3 at 4 as well but that would just yield this variation:
Figure 4 - White Plays on the Inside
We already know that the 3-4 exchange produces only a false eye so again white has failed. The question then is what should white do with these stones? The answer is, for now, nothing. Perhaps in some future fighting white will get a chance to play at K18 and then execute the sequence in Figure 3, connecting his stones to the outside. White can also use this corner for several mid sized ko threats so these stones still have some aji left. Hope you liked the problems, I'm getting to work on the next Shusaku game review as well.


No comments:
Post a Comment