Looking for Something?

Showing posts with label problem. Show all posts

Sunday, September 12, 2010

Basic Life and Death - Part 2

So last time we were looking at the lower right in this situation, remember that it is black to move in either corner and kill, and there were two tesujis that killed white. Go back and look at it if you want but in the upper left there is only one correct move for black to kill. I said before that only one of the tesujis would work but I lied a little, you need both eye stealing tesujis in the upper right but the order is important. Lets look at the problem again:

Reference Diagram
 Black to Move and Kill

So we covered the lower right but what about the situation on the upper side? Black doesn't have quite as firm a grip on these stones so white might have some hope... 

Figure 1 - Failure

Starting From the Outside
Black 7 at 3, if Black 7 at 8
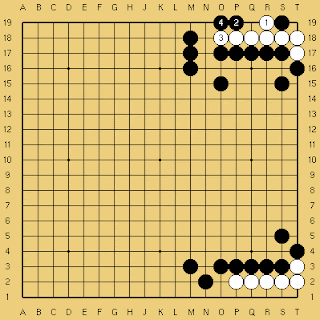
White 3 makes a second eye.

Black tries the eye stealing tesuji of 1 but hasn't bothered to read out the situation. Since the stone at M18 is one line further away than the stone at N2 this move is no longer correct.

Figure 2 - Solution
Starting From the Inside

Black 1 strikes at the vital point. After this there is no way for white to get two eyes. White can respond in a couple of ways but the strongest and most natural is to try to expand his eye space like this:

Figure 3 - White Expands
Black 8 at 6

White expands with 1 and threatens to make two eyes when he blocks with 3. Black simply adds another stone on the inside and white is left with a dead shape. White might alter the move order or try to escape up through 9 but there is no second eye here. White could also play at 4 immediately but then black 1 is enough. White could play 3 at 4 as well but that would just yield this variation:

Figure 4 - White Plays on the Inside

We already know that the 3-4 exchange produces only a false eye so again white has failed. The question then is what should white do with these stones? The answer is, for now, nothing. Perhaps in some future fighting white will get a chance to play at K18 and then execute the sequence in Figure 3, connecting his stones to the outside. White can also use this corner for several mid sized ko threats so these stones still have some aji left. Hope you liked the problems, I'm getting to work on the next Shusaku game review as well. 

Thursday, September 9, 2010

Basic Life and Death

This is kyu material but I thought I'd go over some basic life and death. Look at this diagram and see if you can read out the solutions. Here is a hint: In the lower right there are two tesujis that work but in the upper left only one of these two will work. After the jump I'll have the two solutions to the lower right and next time we'll go over the situation in the upper left.

Problem Diagram
Black to Move and Kill in Either Corner
Note: There are two ways to kill the lower right
but only one to kill the upper right.

Please, lay this out on a board if you can't see the solution and practice your reading. There are only a few possible moves so this will be a good test. Alright, got it? Really? For sure, you know every variation? Ok... here we go!

Wednesday, September 8, 2010

Shusaku Game 4 - Part 2

Onto the second half of the the game. If you missed it here is part one. Shusaku is eleven at the time of this game and is playing black with a three stone handicap. The bulk of the second half of the game is a large ko fight that I'm going to break down into pretty small pieces so we can try to understand whats happening on the board. Here we go:

Figure 1
102-119

Black tries to escape at 4 and here we see the severity of white 99 (the stone at N10). The central white group gets a lot of strength pushing black around and when he pokes at 15 black has no time to connect at 19 but must use 16 and 18 to ensure safety for his large group. Losing these stones is a big setback but black still has the lead. Looking at how the game turned out it is easy to see that black should have played in the center rather than pressuring the white group in the upper left. Had black played at 4 directly with 96 (which was played at D11 to pressure the eye space of the stones on the left side) then the lead would still be solidly in Shusaku's hands. Once the three cutting stones are captured with 19 the pressure black built on the left is meaningless.

Figure 2
120-136

Black ataris with 20 and then white builds up the bottom in the sequence through 35. White looks to get a pretty decent amount of territory along the bottom which, if you look back to before this sequence, is impressive as white was fairly thin around here. With 36 black starts a ko fight that rages through the next 50 moves.

Figure 3
137-145
39, 42, 45 Take Ko

One thing to note is that white has a plethora of threats around 37 but black will be happy to take compensation in another part of the board so he has quite a few himself. This is the style of playing 40. Even if he loses the ko he just has to break up white territory somewhere to win.

Figure 4
146-154
48, 51, 54 Take Ko

Here we continue with black threatening to jump into white's territory while white threatens black's center left position. Even with all the ko threats around 49 this fight is very hard on white. He has to come out of this fight ahead or it will be almost impossible to stage an upset in the endgame. The 52, 53 exchange looks a little strange but black is aiming at the hane at Q14 while white is trying to keep the aji of reducing the corner alive while protecting against the hane. Black retakes with 54 and white will continue to threaten the center left.

Figure 5
155-169
57, 60, 69 Take Ko

When black retakes with 60 white threatens at 61 but when black connects at 62 white must block at 63 or black will play there and his center stones are suffering from a shortage of liberties. If black 63, white J11, black L13 and black has rescued his three stones. Shusaku seizes the opportunity and wedges at 64 in sente to reduce the center and then plays the extremely big point at 68. This lets white recapture the ko with 69 but more or less assures black of a small lead.

Figure 6
170-184
72, 75, 78 Take Ko
84 Fills Ko at O3

White keeps making threats but his position is so dire that even black 76, connecting in the upper right, serves as a ko threat, forcing white to play 77 to keep his territory intact. When white finally runs out of threats and plays 79 to enlarge his territory on the lower side black senses victory. After first playing the endgame sente moves at 80 and 82 he comes back to fill the ko with 84. Black has a small but insurmountable lead at this point and by connecting the ko he shows that he is confident that he can win with the current balance of territory. 80, for example, could have been saved as a ko threat and black might have tried to force white to settle for a less valuable move than 79 but 84 is good enough for the win. 

Figure 5

185-202
189, 192, 195, 198, 201 Take Ko

Another ko fight develops in the upper left but when black simply gives way with 202 the game is pretty much over. The game record ends here but there are only a small handful of points to still be played. If you want to do a quick exercise try to find the biggest endgame move for white (bonus if you find the two biggest and identify which is larger and what order they should be played in). I'll have the answer after the jump. I hope you enjoyed this game even though the bulk of it was a ko fight. Have fun!

Saturday, August 21, 2010

Life and Death Problem 1

Here is the situation and then you can look at the solution and see how this happened and what occurred in the actual game after the jump. Also, I just realized that it would make more sense to just post the problem and solution at the same time and hide the solution by making it visible only after you click on the read more link. That will make it easier to archive the problems because each will only have on post, so after this we'll keep it simpler.

Dia. 1

White has just descended with the marked stone which we decided later was a mistake, instead white might look at playing atari to the left of the marked stone at C18. Alright, its a complicated situation and there may be another way to live, or maybe there is a way for white to kill black but I at least went over this with a dan player and he was convinced that black could live. Think you've got it? Solution after the jump.

Friday, August 20, 2010

Life and Death Problem 2

Here is a decent problem that I adapted from a game I played on KGS the other night.


Black has just descended with the marked stone which gives white a good opportunity. White to move and live on the right. Solution in a few days.

Thursday, August 19, 2010

A Tricky Situation

This comes from a game I played yesterday, I'll go into exactly how this came about and what the in game result was later but look at this and figure out if you can make something happen for black.


White has just descended here which, in an after game review, we decided was a mistake. Black to save some stones on the inside. I'll show how this came about and what happened in the actual game in the next post.

Friday, August 13, 2010

Do You Fear Ko?

Other than the very beginning of the game no other facet of the game of Go inspires confusion like Ko. Studying Ko is a key element of becoming a decent player and a subject that I really want to dig into here. We'll keep studying fuseki but here is a quick problem. Remember: lay it out on your own board and wait until you read out the whole thing before you answer.


The 1-2 exchange is bad for black and by playing tenuki at 3 black is asking for trouble. White to attack the corner, good luck.

This is a classic problem that is good to practice your reading on. I'll give it a few days and then post the solution. Bonus points for anyone who wants to explain exactly why the 1-2 exchange is bad for black.