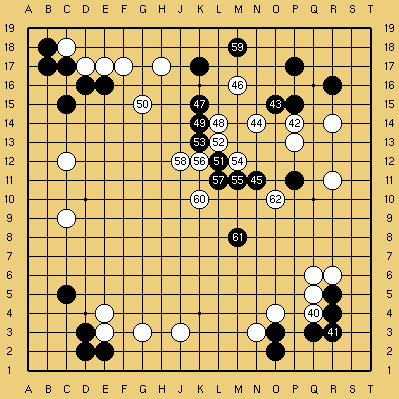
Looking for Something?

Showing posts with label game review. Show all posts

Sunday, September 19, 2010

Shusaku Game 5 - Part 3

Are you ready for a riveting finale? This is a good game and it is about to get very complicated so lets dive in. As always you may want to start at the beginning if you're just getting here or go to Part 2 of the game review. Shusaku is black and has taken 3 stones against his opponent.

Figure 1
154 - 176

White just played the stone at B12 which is a very large point but it leaves some serious flaws in white's shape in the lower right. Black starts his attack at 54 using a hane to reduce white's eye space. Using the aji of the stone at P7 he plays a very sharp sequence that threatens to kill the corner through 68. The price of this is the capture at 69 which black blocks at 70 but then, after exchanging 71 for 72 white initiates a ko with 73. If white can escape and get a couple of extra liberties he can kill the three stones at 60, 64 and 66 so the ko is very urgent for both sides. White 71 is actually another incredibly sharp move because without it black would have the option of crawling along the first line with 70 and linking up with the stone at K2. While this is a fairly crude way of playing it does kill the corner with almost no compensation for white. Black takes the ko and then white makes his best ko threat at 75. Black ignores this threat and captures the corner group with 76. Black has seemingly scored a major success but the threat at 75 is incredibly severe, putting the life of the large black group in the lower left into doubt. 
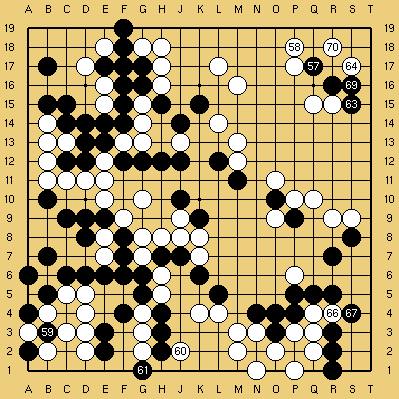
Figure 2
177 - 200
189 at 84
191, 194, 197, 200 Take Ko

White follows up on his threat with 77 and Shusaku strikes at the corner first pushing at 78 and then striking underneath with 80. This allows him to set up a second eye (the first is at E4) via a ko through 90. White captures the ko and black starts with a local threat at 92 which would allow him to connect to the outside. White makes an internal theat of his own and plays 95, aiming at black's other eye. Black has to respond and with 97 white retakes the ko. Black turns to the wealth of ko threats he has against the large line of white stones along the top. Finally black retakes the ko with 200.

Figure 3
201 - 212
3, 6, 9 Take Ko
11 Fills Ko at D2

White continues threatening the other black eye while black keeps threatening the stones up top. The the value of 4 is greater than 10 which is why white keeps resisting for an extra move after 4. When black plays 10 white finishes off the ko, and the large black group, on the bottom. This allows black to wedge at 12 and capture the white stones along the top. While this is not as big as black's capture black also had to give up the lower right corner to set up the attack in the lower left. The value of the lower right and top is very close to the value of the large black group in the lower left. It is rare to see so many large scale captures but this is a particularly violent game.

Figure 4
213 - 233

White starts with some sente reducing moves with 13 through 23. Sente profit taken he plays the largest point available at 25. Black does the same by taking the large gote point at 26. Large at this stage of the endgame is fairly relative as 25 and 26 are worth only about 3 or 4 points. This gives white the chance to play some more forcing moves with 27 through 31. If white had played 27 etc. before stopping to play 25 black might have played around 25 himself instead of answering 27. This game is very close so both players are battling over every point. Finally white makes a gote play at 33 to secure a handful of points on the right side.

Figure 5
234 - 271

This is the rest of the endgame. Shusaku makes some sente plays of his own with 34, 36 and 38 before connecting with 40. White pushes with 41 and then captures a stone in the upper left center with 43. You know the game is almost over when players are making two point gote plays. Black makes some sente moves with 44 in the lower right and then 46 (which threatens a follow up at 47 which is why white defends) and 48 on the left side before defending his center area with 50. We have another series of small reductions with white 51, 53, and then the capture at 55 which black has to respond to or white will enclose another point by playing at 56 himself. From that position further reductions are possible at N1, O1, etc. so black wisely plays 56 right away. From here both players are pretty much grinding out one point plays all over the board.

Finally black plays at 70, reducing white's potential territory by one point and white defends at 71. The game is over and black leads by a single point. Truly a difficult game but the most amazing thing is that this is the work of an eleven year old in 1840. Today there are many young players with terrifying strength but this boy had no access to Go Academies like there are today throughout Japan, China and Korea let alone the wealth of modern analysis that has happened in the last 70 years since the shin-fuseki movement started by Go Seigen and Kitani Minoru. Anyway, I hope you enjoyed this game review, keep practicing and have fun!

Monday, September 13, 2010

Shusaku Game 5 - Part 2

If you missed the first installment and want to catch up go right ahead, we'll still be here, ready? Awesome, lets get going. Shusaku is playing black and this game is from 1840 when Shusaku was ten or eleven. In this game he takes three stones. Throughout this post I keep track of the score so this would be a good opportunity to practice your counting as well. While my own method is by no ways perfect it allows me to keep a fairly precise idea of established territory. This can be useful as if you are behind by more than ten points it usually helps to attack while if you are ahead by ten points you can be happy with simplifying the game.

Figure 1
106 - 126

Black puts his strength to use by invading at 6. White responds by holding down with 7 and building outside strength. Black continues to harass white on the outside and then switches to 26 which robs white's large group of its second eye. Black plays this because of the continuation that will be forced around the L8 point but this stratagem seems somewhat doubtful in that it is likely to weaken the large black group stretching out from the lower left in order to attack the floating white group up top. 

There is very little certain territory but white here has about 6 points in both the lower left and upper right as well as about 10 points in the lower right. His group on the upper left side only has about five points of territory of if black gets to play A18 which is a huge endgame move for both sides. This gives white about 27 points of sure territory. Black, on the other hand, has perhaps five points of sure territory throughout the lower side plus five points in the upper left and another six on the upper right side. This makes for only 16 points. Black has a considerable advantage in influence however and will look to make up the difference by attacking. To be trailing so much in territory entering the middlegame is troubling but this is mostly because of Shusaku's mild fuseki. Black can make maybe 20 points in the center so his game is not bad yet. White must feel good with the situation being semi-equal after taking a three stone handicap.

Figure 2
127 - 153

White threatens to make another eye with 27 and when that is denied pushes out with 29. Here black gives way with 30 allowing white to connect at 31 which puts the black stones below in a precarious position. We see black's plan with 32 and the following harassment of the floating white stones though to white 43 which firmly establishes the connection to the secure white group below. Now both sides take some large points and black is canny in taking 44 instead of 45. Both these moves are large but if black plays at 45 and white plays at 44 white would have a good follow up move around G13 whereas there is no large scale continuation for white 45. This allows black to keep sente to block at 46 which creates some serious problems with white's shape in the lower right corner. After the quick sequence where black exchanges 48 and 50 for 49 and 51 black takes another large point with 52 and white follows suite at 53. 

Now the territories are even more set so lets look at the score so far. Black has solidified his territory at the bottom right and now has about 10 points of sure territory, adding the eyes of the group on the lower left we can estimate about 13 points for the bottom. Black has expanded his territory at the top to about 14 points plus one for the eye at S13 makes 15. The big increase has come in the center where black has made about 16 points of sure territory and this might later swell to closer to 24 depending on the in game play. Total this and you have 44 total points for black. 

White's lower right corner is in trouble so we might count two points for white at T4 and T5 but this is no longer solid territory for him. He has expanded the right side to 12 points so we can count 14 for him here. The upper right and lower left corners are still at 6 apiece for 12 total points here and there. This shows the value of counting early to get estimates, many situations don't change and if you already know that these two corners are a certain value you can rapidly make accurate estimates of the scores in your games. White has also expanded the upper left and now has about 13 points here. With the couple other small patches in the lower right center and the two spaces at B7 and C7 (which count double since they were captures) we can add another 7 points to white's total. That gives white a total of 44 as well. While my counting isn't the most accurate in the world (the lower right corner is actually worth 7 points, among other minor assumptions here and there) it shows how close this game is.

Hmmmm... This has turned into a sort of counting workshop so let us go over my technique for counting in a post soon. Next time see the thrilling conclusion of this very close game, till then, keep playing and have fun.

Continue on to Part 3

Sunday, September 12, 2010

Shusaku Game 5

This is a great game that was played down to the wire with both sides fighting till the very end. Finally the margin of victory comes down to a single point. This is another game from 1840 and Shusaku will be taking three stones as black against the same opponent both this game and the next.

Figure 1
Moves 1 - 26

Black plays thickly in the upper right but allows white to develop on both sides. When white siezes the whole board initiative with 15 and 17 one has the feeling that white is satisfied with his rapid development. With regards to 16 and 18 these were standard responses at the time. Since opening theory was centered around the 3-4 point the use of the handicap stones was not so well researched. The idea here is to rapidly make territory by making the large knights extension and then enclosing the corner at C4 or R4 respectively. The in game result, though, gives black an unacceptably low position on the bottom. 16 is questionable but not fundamentally wrong but 18 should absolutely be a one point jump to O4. This puts much more pressure on white 17 and balances out the low position of black 16. 

White continues by invading the corner and living swiftly through 25. White 23 could be played at 24, black responds at R14, but after white defends in one way or another it is unlikely that black will respond, deciding instead to take sente and play elsewhere. Black gets magnificent thickness and seals white in on both sides but through 26 white still has sente.

Overall this opening is a good success for white. The 15-16 and 17-18 exchange favor white and black's play has been a little slow so far. This is typical of Shusaku's early childhood in general. In the middlegame we can see a deep reading ability that rivals any of his elder's. His opening play, in contrast, is incredibly mild. This is probably the result of not having played enough games to get a good feel for the openings. These games in particular were probably the first time young Torajiro was playing strong, established players. The difference in having played an extra several hundred games is invaluable. Despite the general success of white's quick opening play the three stone handicap is telling and Shusaku will soon show his teeth.

Figure 2
27 - 53

White makes a solid extension to 27 and finally black gets a chance to breath. Black invades at 28 and we can see how the modern one space jump would work better with 28 than the large knights extension at G3. Again the one point jump was rarely played in the 1840s so we can forgive black for following tradition. White invades a second corner with 29 and establishes a living shape through 37 before setting his outside stone in motion with 39. This may be a little premature for this sequence but in a three stone game white probably welcomed the opportunity to start a fight. White moves out smartly to 49, black seals white into the corner with 50 and then white responds to the jump to 52 with the shoulder hit at 53. I get the feeling that white is seeking complications even though black's position is fairly thick throughout the board. Black will have to watch to make sure his large group in the lower left doesn't come under attack during the large fight brewing in the center.

Personally I would like to ignore 53 and maybe make a splitting move around K5. This attacks both the solitary stone at 53 and the large white group above. Secondly it gives good eye making space with a follow up at K3. The main reason for ignoring the shoulder hit at 53 is that black has nothing to worry about another white move here. Against N4 black can fall back to O3 and against M3 white can push up to N4.

Figure 3
54 - 76

Black responds by pushing at 54 and when white jumps to 55 we see his intent to harass the large black group in the lower left. Black responds positively by breaking out with 56-64 and then linking under with 66 and 70. White tries to link up all his stones with 69 but after 71-75 black shows fighting spirit by cutting with 76. There are a lot of things to manage right now but the main point is connection. White has three groups of stones that are in danger. The first is the large dragon starting at A7 and stretching across half the board, the second is the floating group from 55-69 and the third is the weak group on the right side. If white can connect these stones together they will be safe but if black can isolate even one of them his game seems promising.

Figure 4
77 - 105
Note 1-5 = 101-105

White doesn't respond directly but instead plays 77. This resolves the situation for the weak group on the side as it is now unquestionably alive. It is large in territory as well given the follow up move at the 3-3 point. Shusaku plays at 78 to separate the other two white groups. After jumping to 79 white comes back with 81 to capture the cutting stone. Now white has settled two of his three weak groups so black will look to attack the remaining one.

This is indeed what happens through the next series of moves. Black has already played 80 so sealing in white with 82 is only natural. White expands his eyespace with 83 but black reduces it with 84. Black strikes at 90 to protect the cutting point at C10 and after black 92 white feels secure enough to play at the large point in the lower right. Granted, black could rob white of his second eye with a hane at A9 but with cutting points at both H9 and L9 black would not have a lot of confidence in the ensuing fight. Note that White can play at A9 to make certain life for his group but this would be gote and against three stones he has to leave weaknesses behind him and strike at black directly.

After white 95 black attacks the stones in the upper left. This is very astute since weakening these stones helps if white tries to cut through black's position at either of the aforementioned points. After white connects at 101 (1 in Figure 4) black makes a sente reduction on white's upper right corner. That concludes our review for now but I'd like you to look at the timing of black's last two moves. These are his sente, but if played too early white might sacrifice the corner and come out ahead in another area. Too late and white might hane at Q18. This is excellent timing and shows Shusaku's unearthly reading abilities at a young age (I believe he is eleven at the time of this game). Till next time, play hard, read well and, above all, have fun!

Wednesday, September 8, 2010

Shusaku Game 4 - Part 2

Onto the second half of the the game. If you missed it here is part one. Shusaku is eleven at the time of this game and is playing black with a three stone handicap. The bulk of the second half of the game is a large ko fight that I'm going to break down into pretty small pieces so we can try to understand whats happening on the board. Here we go:

Figure 1
102-119

Black tries to escape at 4 and here we see the severity of white 99 (the stone at N10). The central white group gets a lot of strength pushing black around and when he pokes at 15 black has no time to connect at 19 but must use 16 and 18 to ensure safety for his large group. Losing these stones is a big setback but black still has the lead. Looking at how the game turned out it is easy to see that black should have played in the center rather than pressuring the white group in the upper left. Had black played at 4 directly with 96 (which was played at D11 to pressure the eye space of the stones on the left side) then the lead would still be solidly in Shusaku's hands. Once the three cutting stones are captured with 19 the pressure black built on the left is meaningless.

Figure 2
120-136

Black ataris with 20 and then white builds up the bottom in the sequence through 35. White looks to get a pretty decent amount of territory along the bottom which, if you look back to before this sequence, is impressive as white was fairly thin around here. With 36 black starts a ko fight that rages through the next 50 moves.

Figure 3
137-145
39, 42, 45 Take Ko

One thing to note is that white has a plethora of threats around 37 but black will be happy to take compensation in another part of the board so he has quite a few himself. This is the style of playing 40. Even if he loses the ko he just has to break up white territory somewhere to win.

Figure 4
146-154
48, 51, 54 Take Ko

Here we continue with black threatening to jump into white's territory while white threatens black's center left position. Even with all the ko threats around 49 this fight is very hard on white. He has to come out of this fight ahead or it will be almost impossible to stage an upset in the endgame. The 52, 53 exchange looks a little strange but black is aiming at the hane at Q14 while white is trying to keep the aji of reducing the corner alive while protecting against the hane. Black retakes with 54 and white will continue to threaten the center left.

Figure 5
155-169
57, 60, 69 Take Ko

When black retakes with 60 white threatens at 61 but when black connects at 62 white must block at 63 or black will play there and his center stones are suffering from a shortage of liberties. If black 63, white J11, black L13 and black has rescued his three stones. Shusaku seizes the opportunity and wedges at 64 in sente to reduce the center and then plays the extremely big point at 68. This lets white recapture the ko with 69 but more or less assures black of a small lead.

Figure 6
170-184
72, 75, 78 Take Ko
84 Fills Ko at O3

White keeps making threats but his position is so dire that even black 76, connecting in the upper right, serves as a ko threat, forcing white to play 77 to keep his territory intact. When white finally runs out of threats and plays 79 to enlarge his territory on the lower side black senses victory. After first playing the endgame sente moves at 80 and 82 he comes back to fill the ko with 84. Black has a small but insurmountable lead at this point and by connecting the ko he shows that he is confident that he can win with the current balance of territory. 80, for example, could have been saved as a ko threat and black might have tried to force white to settle for a less valuable move than 79 but 84 is good enough for the win. 

Figure 5

185-202
189, 192, 195, 198, 201 Take Ko

Another ko fight develops in the upper left but when black simply gives way with 202 the game is pretty much over. The game record ends here but there are only a small handful of points to still be played. If you want to do a quick exercise try to find the biggest endgame move for white (bonus if you find the two biggest and identify which is larger and what order they should be played in). I'll have the answer after the jump. I hope you enjoyed this game even though the bulk of it was a ko fight. Have fun!

Tuesday, September 7, 2010

Shusaku Game 4

This is a classic game from Shusaku's youth. This game is also in Invincible: The Games of Shusaku so I was able to find out the name of his opponent. The year is 1940 and Shusaku takes 3 stones against Ito Shuwa 6 dan, the head Honinbo disciple. Shusaku is still very young (and, actually, if I keep going through this book in order he will continue to be very young for many more blog posts, maybe I'll switch it up and do a game from later in his life next time) and his style is not fully refined but his play is still very strong.

Figure 1
1-28

The large knight move was a standard response in handicap games at the time. In contemporary Go the one point jump is considered a more active way to play since it works with the star point stone to build influence. Black plays solidly up through 19 but his attachment at 20 is suspect. As a rule of thumb one shouldn’t attach to weak stones since it makes them stronger. The other problem with this sequence is how well white’s approach move at 5 coordinates with the finished shape. If there were a black stone at 5 instead then this would be a good sequence since a black stone here would be aimed squarely at the weak underbelly of the white formation. Finally black has to go back to connect with 28 which means white has settled his stones on the right side in sente without any effort on his own part.

Figure 2
29-51

White makes two approach moves in the upper left which is a standard handicap strategy to complicate the game. Black might have wanted to make a one point jump to 34 instead of pincering with 32. It is hard to argue with 32 as making an extension and a pincer is almost always a good idea. Black attaches at 34 to separate white’s stones. Why does Shusaku attach at 34 instead of attaching to the other white stone at 29? The answer is simple, as a rule of thumb, you should always attach to the stronger stone. The white stone on the upper side is already caught in a pincer while the stone on the left side has plenty of room to make an extension. Since the stone on the upper side is weaker black naturally attaches to the stronger stone on the left, making it and his own position stronger. This is also a basic example of a leaning attack. Black attaches to the stone on one side to build up strength for the forthcoming attack on the other.

When white makes his own attachment at 39 he still needs to extend down the left side to stabilize his stones, but by starting a fight on top with 39 and the crosscut of 41 he is aiming at pushing through at D15. If he can cut through successfully he won't need to extend down the side. Because of this cut black has to handle this situation very carefully. Since we’ve been talking about attachments a lot lets look at 39 some more. The black stone at K17 is very strong since it entrenched on the third line and is a two space extension from another stone. Strengthening such a stone hardly matters since black’s position is already so secure. Through 51 white first leans against blacks corner in the upper right and then wraps around black’s two stones in the center. We can see a fierce fight taking shape along the upper side.

Figure 3
52-78

The fight is very complicated but white slips slightly at 63. This move seems a bit slow and allows black to take sente and cut at 68 which is very severe. White has to scramble with three different weak groups floating on the upper side. With 77 he manages to link one group to the left, simultaneously sealing black into the corner. Black lives in the corner with 78 and now white turns back to the other two weak groups. Though the situation is very complicated black has done well during the fight, securing his stones in the corner and keeping the pressure on white.

Figure 4
 79-101
Note: 1 = 101

This fight is tricky and up through 95 both sides play very strong moves. Shusaku slips with 96 which should be played to prevent a move like white 99 (probably at M10) which is very severe. With 96 black is looking to kill the large white group wrapped around the upper left corner. In Go it is usually inadvisable to attempt such large captures and instead opt for forcing your opponent to live small. In this particular case it will be hard to kill this group because the black corner is still somewhat precarious and white will be able to use that aji very effectively to get his own eyes. Since it is unlikely that this group can be killed 96 seems to be an overplay. White exchanges 97 for 98 and then strikes at 99 which is very severe. Now it seems that black will have to do some scrambling of his own. Black follows up 96 with 100 but it is hard to see much coming from this attack after white 101 (1 in Figure 4)

Next post we'll wrap this game up and maybe I can get some more problems up later today. Hope you enjoyed this so far.

Continue to Part 2

Saturday, August 28, 2010

Shusaku Game 3 - Part 2

Back to our Shusaku review! If you missed it here is the first half of the game, now lets see how it ends.

Figure 1
76-101
Note: 1=101

White starts by reducing the corner a bit with 76 and 78 and then makes yet another dubious peep at 80. This really is the moral of this game: 'think before you peep'. First black turns at 81 and white runs away with his two weak stones at 82. Then black directly resists the peep buy pushing at 83 rather than connecting. White makes another peep, this one actually a forcing move, at 84 and after black connects white defends the territory on the right at 86. Now black threatens to capture the peeping stone with 87. White manages to pull it out through 96 but this allows black to poke his head out at 91 and connect at 93 in sente. Now black turns back to the center right  and captures the two white stones here. I strongly encourage you to see how these two white stones came to be here and how black has succeeded in turning the tables on white. There are some good lessons on peeps and how to resist them in this game. I would also like to point out how well black's two stone sacrifice at H10 and J10 has worked out. White needed yet another move at 100 to firmly capture these stones. If white instead plays at N8 (black 101, or 1) to rescue one stone black will crawl out at 100 and the resulting fight is not very good for white. After 101 black can make two eyes in gote or white can connect at N10 to give black one oversized eye. The downside for white is that even if he does this black has a tremendous number of liberties because of his 5 point eye. It will take white many moves on the inside alone to reduce black's liberties which gives black a huge advantage in future fighting. Though black is not yet definitely alive he has lots of tactical possibilities so the conclusion is that this result favors Shusaku.

Figure 2
102-131

White starts to reduce black's territory and expand his own with 2 through 10. Black 11 is very important. Without it white will play here to seal black into the corner in sente. This will give white a chance to stage a comeback by getting territory in the center. 12 is gote but very big because it has a followup at T3. With 13 black starts reducing the right side. This sequence is pretty easy to understand, black wants to do as much damage as possible while retaining sente and by pushing down to 21 Shusaku makes 23 sente as well. White cannot fight this ko (this is what they would call a 'flower viewing ko' for black. This is a strange phrase but it means that the ko is as pleasant of viewing flowers for black. If white doesn't immediately connect and black starts this ko there is no risk for black so white will not risk this fight no matter how large his advantage in ko threats) so he connects. Black reduces the lower side with 27 and 25, pokes at 29 and then secures a second eye by playing at 31 as you can see in diagram 1.

Dia. 1

Once the marked stone has been played white can no longer rob black of his eyes by playing at 1. Black cuts at 2 and through 6 makes a second eye. With the black group in the center safe and the white territory on the right reduced to a manageable amount the game seems very favorable for black. The last area where white might be able to get moderate amounts of territory is open to incursions from the black stones at D5 and J7. Meanwhile black has four corners and no weaknesses.

Figure 3
132-149

White first plays at 32 which is a good forcing move, ensuring connection and forcing black to connect on the second line. White 34 is very large and sente besides. This is a classic endgame tesuji known as the Monkey Jump and it is required study for intermediate players. Any book with a thorough treatment of tesuji will cover the basics but there can be a great many subtleties in precisely how to respond, both for white and black. White continues in sente with 40 and 42 and then turns to harassing the upper left. After black connects at 49 though it seems that there is no real room to create complications and is behind in the territorial balance. Because of black's deft play and excellent timing in responding to a series of white peeps gave him a solid lead on the board. White resigns after 149.

I thought there were great lessons in this game relating to forcing moves, or kikashi if you want to use the Japanese term, and how to potentially ignore what your opponent thinks is a forcing move. The key is to always be on the lookout to take sente. Every move you should evaluate if you really have to answer your opponents move or if there might be a bigger point somewhere on the board. I hope you enjoyed the review! Till next time, ciao!

Shusaku Game 3

Howdy there, this one is shorter and less complicated than the last couple of games so we'll blaze through it in probably two posts. This is the first game where Shusaku is officially ranked as a shodan but he is still ten years old. Over the next two years he grows incredibly strong. You can still note some moments of weakness but were you to ever see a young child display this level of talent on a goban I would think you would be excited to see such a young prodigy.

Without further adieu, lets get to the game. Black is Shusaku and his opponent is 3 dan. There is no komi as was traditional at the time.

Figure 1
1-20

The fuseki is of note because of 4 and 5 which are both played away from the corner. Shusaku tends to play a tight, territory oriented, opening in these early games and seems happy to take the corner with 7 and 9. White 6 might seem a little sub-optimal, giving black a large corner and leaving the white formation open at the bottom but I think that 6,8 and 10 work well with white 20, giving white a large formation facing the center. When black approaches at 11 white pincers at 12, one space closer than is often played. This crowds black a little more and black plays an easy variation that settles his stones quickly. This allows black to turn to the bottom right and approach at 19 which prevents white from playing at the same point which creates a nice shape across the lower side. White's formation across the bottom is his chief asset in this game as black has taken a position in all four corners.

Figure 2
21-39

The exchange in the lower right is typical of opening on the 5-4 point (Q5 in this case). White gets influence and black gets secure territory. Black 29 looks small but concerns the base of both the black and white stones, white would also make a base by playing here and then black would like to extend to C13 but because of white's stone at C12 he would have to play at D14 to make shape. No matter how you cut it black's shape looks cramped. After 29 Black is unconditionally alive and doesn't have to worry about his stones in this corner. Whites stones, however, are somewhat weakened. After 29 a black pincer against the C12 stone would be severe so white makes a two space extension to 30 to establish a base. Black exchanges 31 for 32 before confronting white at 33. This move combines well with 29 and when white ignores this again to play 34 black forces at 35 before reinforcing his corner at 37. I'm a little doubtful of 35 actually. It doesn't seem necessary as black's group in the corner is already alive and the extra stone at 35 doesn't really add much pressure to the two white stones below. In fact this two space extension makes building influence across the left side uninteresting. I would rather keep the aji around G18 intact and simply reinforce at 37 directly.

Speaking of 37, this is the key point in the corner in this formation and if black neglects it white will gladly play there, pressing black down and playing on a grand scale in the center. Imagine a white stone here: This would be a good result for white. Even though black has all four corners all of white's stones are working together to form central influence. Black 37 is also big along the top, forming a good formation with 33 and P17. Finally black 37 prevents or limits white's probing moves in the corner. These are a little beyond the scope of the commentary here but white has numerous probes to use against the small knights enclosure, you can explore some of the possibilities of white playing at P18 or R17 among others, particularly before black reinforces at 37. White builds a moyo with 38 and black begins to reduce white's central influence with 39. The crux of this game is whether white can get a big center. Black has good positions in all four corners so the center is the only place for white to catch up in territory.

Figure 3
40-62

White forces at 40 before turning to the fight at hand. Through 48 white moves into the center and gets to jump into the potential black territory at 46. After black 49, though, white has to turn and reinforce his other group at 50. This gives black the chance to counter in the center. With 51 he seals white in and develops his two stones at 45 and P11. White shows no fear and cuts with 56 and 58 while black connects with 59. White continues to develop his cutting stones with 60. Black jumps out to 61 and white peeps at 62. Often a peep is proper kikashi, a forcing move, but in this case the situation is a little more complicated. Certainly if white pushes through at O11 he enlarges his side and no longer has even the faintest worry for his group in the upper right. On the other hand the center is the crux of the game right now, not the right side. The relative strength between the 56-60 white group and black's central group at 45, 61, etc is the urgent situation on the board right now. It is good to get in the habit of questioning your opponents peeps. You will often find that the consequences of the cut are small enough that you can ignore or somehow resist the peep.

Figure 4
63-75

Black ignores the white peep to connect at 63. White makes a very dubious second peep at 64 and black counterattacks by pushing at 65 and cutting with 67 and 69. Here black sacrifices two stones to play 71 and then connect at 73 in sente. After white plays at 74 black comes back and connects at 75. It may be a subtle point but kikashi should be light and after black plays 63, 71 and 73 these stones seem a little heavy, nearly engulfed by a very thick black position. It will be hard to pull out these two stones and also protect the potential territory on the right side. Also black's two stones at 67 and 69 are still working well and preventing white from putting too much pressure on black from the other side. Since it seems doubtful that black's large group in the center will be captured it seems very hard to see white making much territory here. From this we can conclude that the game is better for black who already has all four corners. We'll see more fighting in the center when we wrap this game up in the next post. Thanks for following along! I hope you enjoyed this review.

Monday, August 23, 2010

Shusaku Game 2 - Part 3

We're going to wrap up this lovely little game here in this post. I'm really having fun doing these Shusaku reviews and I hope you are enjoying them on your end of the inter-webs. You can follow this game from the beginning or check out other problems (there will be more eventually, I promise!) or study fuseki around different areas of the site. Without any more delay lets wrap this game up.

Dia. 1
110-118

I think that white takes the lead with 10. It is hard to say for sure but white just seems to get too much territory around the top right. After 17 the situation in the lower left is very interesting. Black can kill white by capturing 12 but white figures that another mover around M14 will enclose enough territory to win easily without the corner. Also white has gotten to play 14 which gives him good prospects for enclosing territory on the bottom. Black may have thought that he had to capture or pressure the white corner in the lower left but I think 17 has to be somewhere along the top or maybe even on the right. Something has to be done about the white moyo. The downside of not playing 17 is that if white plays there he is unconditionally alive and black will have no attacking moves. This dilema shows how hard the game is for black now.

Dia. 2
119-138

This is a good example of how to tenuki to take sente. Black makes an extension to 19 and would like white to answer so he can take some profit in sente and turn to attacking the top. White has other plans and peeps at 20 to make aji (you can see this if you imagine a white move at S7 later, it impacts a lot of reads) and then jumps to 22 along the top. After 24 and 26 I really don't like Black's position. If white gets a whole quarter of the board the balance of territory completely collapses. Yet it seems an invasion isn't practical either. The capture at 36 is well timed too and when black jumps to 37 an interesting ko shape develops. Either side can start the ko by throwing in, white at White manages to keep black off balance throughout this sequence and ignores 37 to swing back and block at 38. I think that even if black takes the corner by playing at A3 white still gets plenty of territory in the upper right.

Dia. 3
139-156

Black exchanges 39 for 40 before solidifying his shape with 41. Knowing that he is behind Shusaku plays a very daring sequence and through 47 cuts white in two! Now white has to worry about making sure this group survive and with 49, 51 and 53 manages to capture some white stones. While this is a great tactical sequence I doubt it is enough to redress the territorial imbalance but in addition to capturing three stones the potential white territory on the bottom has been destroyed. Perhaps if black can take the lower left corner the game will be winnable for him. When white descends at 54 black starts the ko fight. It is a little unpleasant to start this ko since white gets to capture the ko first. This is a big advantage in a ko fight since your opponent has to make the first threat. Black has a lot of threats in the upper right, he can threaten to live in the corner with his sole black stone but white is not without resources either.

Dia. 4
157-171
62 at A2, 65 at 59,
68 at A2, 71 at 59

Ahhh... ko fights! This is a big one so we'll try to take it slowly. First black makes use of his threats in the upper right and retakes the ko at 59. White makes a great ko threat at 60. Remember how I said black would have to break up the lower side and kill the corner to have a chance? This offers the corner for the side and black cannot take that offer if he is to even dream of winning. Black blocks at 61 and white retakes the ko, black keeps on using his threats up top with 63.

Black now takes the ko with 65 but white has another large threat at 66. Black is still mining the top right for ko threats and after the 69-70 exchange is able to, once again, retake the ko. This is a pretty straightforward ko fight. The size of the ko is very large and each side is playing their biggest threats. Certainly if you were able to read out the available ko threats in this situation you would be a very strong player.

Dia. 5
172-191
79 at B3, 82 at 74
85 at B3, 88 at 74

The ko fight continues and the most interesting part is how white uses his ko threats along the bottom to counter black's wealth of ko threats in the top right. These threats aren't as big as the black ones in the upper right but there are enough to preserve his lead. Finally black runs out of threats in the corner and has to continue at 89. This is small enough that white captures at 90 ending the ko. After 91 black captures four white stones and makes around 14 points of profit but this is not enough. The white position in the top right corner is overwhelming and after black's ko threats up here there is not even a shred of aji left for him. I think black is more or less looking for a spot to resign but Shusaku still has some fighting spirit left in him.

Dia. 6
192-208

After the top plays out black makes another desperate stab at winning. After connecting at 97 he rescues his cutting stones with 99 and looks to attack the large white group in the center left. White has read out all the variations and counterattacks at 2. After the 3-4-5 exchange white plays at 6. Now white the white capture of either the group connected to 97 or the three stones at 5 is miai, guaranteeing life for the large white group. After white captures at 108 black resigns.

One question I've had with these games is "Exactly how strong are these players?" At the time of this game Shusaku was still known by his childhood name, Torajiro, and is only ten years old at. His opponent was 3 dan and I'm unsure of how classical strength was measured. There were no pro leagues but most strong players had patrons that bankrolled their study. I would think that a 3 dan in 1839 Japan would be a significant achievement. On the other hand the level of Go/Weiqi/Baduk has risen greatly in the last 100 years. This is also one of only two games of his that were recorded before he was called a Shodan. I think these players are probably around the strength of a modern amateur shodan player. The games are very good with many sharp lines but I don't feel this is totally out of my depth either. Also, I've looked at some of the other games and Shusaku gets a lot stronger in the next couple years of his life. Anyway I hope you appreciate the game.

I apologize if my commentary has any mistakes. To my knowledge no dan player has even looked at the site yet so there may be some corrections coming my way! I look forward to it too. I am trying to build a community of go players, particularly in the US and Europe. If you haven't yet, go register with IgoLocal.com and start finding players in your area. One day I dream of a Go Academy in the US and when young children here rival the best that Korea, China, and Japan have to offer.

Speaking of Go in Europe I want to give a special thanks to the Club de Go Nam Ban in Madrid, Spain for their hospitality and their strength. Seriously, this was one of the best Go clubs I've ever been to, if you get over there check them out. 

Shusaku Game 2 - Part 2

More Shusaku! You having fun yet? We'll be going over another game from 1839 which means Shusaku is nine or ten years old. I feel like these games are definitely good material but not so advanced that we cannot comprehend what is going on. If you want examples of really complicated games try looking at some some of Go Seigan's fighting games (courtesy of gokifu.com, you can also download sgf files directly from their website). Here we should be able to follow along pretty well with our own skills. Perhaps as we go through the game record we can improve alongside Shusaku so that when we get to his later games when he was in the full flower of his skill our own abilities will have risen somewhat and we can continue to enjoy these marvelous games.

If you want you can jump to the beginning and see what has happened so far and you can always go to the 'Game Reviews' tab along the top to get a full index of games that I've annotated here. Shusaku is black, his opponent is a 3 dan player (sorry, I don't know his name, the book I have is in Mandarin which I tragically cannot read), and there is no komi.

Dia. 1

White has just lost a ko in the upper left giving black a big corner but allowing white to play two moves in the upper right. Black's stone at R16 still has some aji but black will have to find the right time to make use of it. Black approaches and white pincers at 56. This type of move should be reflexive and automatic. Any chance to extend while making a pincer is worth taking. Black presses white down a bit and then plays lightly at 61 and 63 so Shusaku can take sente to crawl out with his cutting stone. Had white captured this stone, maybe in a net at G11, the white wall along the top would dominate the whole top half of the board with its thickness. We can see black's plan take shape through 69, white has to scramble to escape with his group on the left, and with 75 and 77 Shusaku destroys white's wall and breaks out into the center. White, though, has gotten to play 76 and seeks compensation with 78.

White 78 is kind of a tricky move. In some shapes this is a tesuji, the one space diagonal jump, but in others it leaves a weakness at the middle point, here that would be D6. In the game black chose to play 79 and it is easy to see why. If black defends the corner or even hanes above or below at B4 or D4 white will fall back and capture the black stones above. This is unacceptable because black wants to continue attacking these white stones and this would give white not just a base but some territory besides. Black choses a difficult path with 79 but I'm not sure what choice he really has. I think after investing the stones at 65-69 that black needs to attack these white stones to maximize his overall efficiency.

Dia. 2

Here we see the trade take place with black sacrificing the corner (his stones still have some aji but white's four stones are obviously very thick) to keep up his attack. This also concerns the base of the black stones on the left. As a rule of thumb a move that concerns the base of both weak groups in a fight is extremely important. Rather than letting white capture these stones black judged the fight to be most urgent and so decides to simply let go of the corner. First he pushes out at 81 and 83 and then, since white has to descend to 84 to break up black's corner enclosure, has time to cut at 85.

Dia. 3
Note: 1 = 101

White forces at 86 and 88 and jumps to 90 which do a good job of reinforcing the large floating white group. It is hard to see black surrounding white after these moves. Black turns and threatens the top with 91 which helps get rid of the aji around J15 that white had. After black connects with 93 white hanes at 94 to slow down any black attempt to try something in the corner. When white cuts at 96 the situation becomes more dire for black on the right side. While he settles his stones in the lower right white can probably solidify a large territory in the upper right.

Dia. 4

Black pushes white around a little bit with 3 through 7 but white gets the time to play 10 which is a really large move. After this it seems hard for black to win. Black's corner is decently big, about 23 points in the upper left but white will get much more than that either on the top or, more likely, on the right side. It seems that black must take back the lower left and prevent white from making any territory on the bottom to win. While one of the two might be possible I doubt that black can achieve both. The alternative is too invade and escape but after 10 this seems difficult. The game isn't over yet but I think that the situation is easier for white, it is probably best not to relax when your opponent is Shusaku though.

Tune in next time for more exciting adventures of Torajiro and the Goban vs the World.

Continue on to part 3.

Sunday, August 22, 2010

You want Shusaku? You get Shusaku!

The small handful of people who have been to the site seem to really like the Shusaku game review. I figure that I'll just start going through his existing game records and commenting on what I can see in the games. I apologize for the inevitable mistakes. I feel like I have a strong understanding of the game but am also far, far away from mastery. Since this commentary is aimed at kyu players I should be able to offer some insight into what is going on. I would greatly appreciate any stronger players who might want to contribute to our collective understanding of this beautiful game. If you are just joining us then please look at the previous game record of Shusaku's that I commented on last week.

Now, lets get into the next game. This is also from 1839 when Shusaku was ten years old. His opponent is a 3 dan player. Remember that this is before the invention of komi so games could be tied and taking black was a huge advantage.

Dia. 1

Here we have a fairly standard classical fuseki with all initial stones being played on the 3-4 point. The pincer at 6 is fairly loose so black feels comfortable playing tenuki to enclose the corner at 7. I have a hard time deciding whether 8 is good or not. It seems very large to extend down the left, establishing a base while also reducing the value of black's enclosure. This also increases, albeit indirectly, the pressure on black's stone in the upper right as it it is no longer possible to directly attack the white pincer. If black encloses the corner at 8 then white can enclose his own corner in the lower right. On the other hand it is common thinking that allowing black to enclose two corners is a little slow for white, who is already behind by a move, so perhaps white 8 is appropriate. When black attacks at 9 I feel some apprehension though, especially as black 9 is very big, being an extension from the black shimari in the lower left.

White 10 and black 11 are generally considered a little slow in modern thinking. Regardless of that they remain solid moves. Perhaps the efficiency is not as high as it could be but most of that difference is made up by the solid nature of the shape created by the diagonal extension. White jumps to 12 and it looks like we will have a fight on our hands. Black would like to settle his stones and build up the lower left corner while attacking 6 and 12. White will look to harass black's group while leading 6 and 12 into the center and solidifying territory along the top.

Dia. 2


Now we see how this fight played out, black peeps at 13 to make the white stones heavy and then slides into the corner to try to get eyes. White 16 and 18 are very sharp, allowing white to destroy any potential eye space black might have found on the side. White reinforces the top with 24 and Shusaku wastes no time attacking at 25 and 27. These are very good, basic, attacking moves. Note how well 25 and 27 coordinate with the black enclosure below. White naturally counter attacks at 29 and black attaches at 29. This fight is about to get very complicated but I think we can follow it. While the black stones are weak they have a move at C18 that will get them two eyes. While simply surviving like this would represent a loss, the ability to fall back and live allows black to fight to the limit. Remember also that the white group is also weak. Black should be able to use the aji available to craft an acceptable result.

Dia. 3

This is a beautiful sequence that demonstrates the prover 'There is no ko at the beginning of the game.' The meaning of this proverb is that if a ko emerges at the beginning there are no ko threats so whoever captures the ko first will simply ignore any threat and finish the ko. Black pushes through with 31 & 33 and then turns to cut at 35. Then black continues to push and white is forced to start a ko to save his stones. Black captures the ko first and then white makes a very serious local threat at 46. I just said there are no ko threats in the beginning but this is a local threat that deals with the ko specifically. If black fills the ko at 34 then white will cut at 47 and capture the whole group connected to the ko. Black has no choice but to connect at 47. Fortunately for black he also has a local ko threat. If white ignores 49 to connect the ko then black will cut at 50 and kill the white stones outright. After this white takes the best option available by pressing at 52 but, like the proverb says, there is no ko at the beginning of the game and black fills it to take the corner.

This result is actually fairly close to even. Black has taken a large corner in the upper left but so has white in the upper right. Black's five stones in the lower left map out a very large territory but the white wall on the top coordinates well with the upper right. Since black has sente I think the game is slightly better for him so far but, again, my analysis may be somewhat off. Hope you have enjoyed this series. Continue with the game in the next post.

Saturday, August 21, 2010

Shusaku Game 1 (Part 5)

Here we go, we will wrap up this game and then find something new to dig our teeth into. I will be doing many Shusaku game reviews here but sometimes I will pick out pro games too, especially when looking at fuseki which has changed a lot. There will also be more problems as time goes on, which reminds me I have to post the solutions to those two life and death problems. If you're just getting here you can go to the beginning or click the link to 'Game Reviews' at the top of the page to go to a page that will have links to all the games I go over on this site.

First of all I'm going to backtrack here and cover the end of the ko fight that were were looking at last time because this is where (I think!) black pulls ahead. Black 29 has just taken the ko to the left of 47 and white makes a ko threat by peeping at 30 along the top.

Dia. 1

Black ignores this ko threat and turns to attack the large white group on the bottom. The logic is that after 31 and 33 the white cut at 49, setting five black stones adrift, is no longer very threatening to black. This is doubly true because the white stones in the top center are very weak and have bad shape. 33 also weakens this group further. White has no time to take the ko after 33 because he has to make eyes for his large group on the bottom. While he manages to make two eyes through 46 black is comfortable enough to ignore white 30 and fill the ko at 47. White would like to play at 49 to profit from his ko threat but the white group in the center is so weak that he has to take the time to reinforce it at 48. Black now descends at 49 so white can't even get partial compensation from the ko.

We can see that white 30 was actually a mistake that allowed black to gain the advantage in the center and eventually win the ko fight. This also shows the wisdom of not following your opponent around the board. Had this been my game I might have reflexively answered white 30 and then gone on the lose the game. Every move you should take stock of whether you truly have to respond to your opponent, take every chance you can to get sente and execute your own plan. If we remember that white had to add the stone at R12 to increase the value of the ko we see that white has invested a number of stones into this fight and gotten almost nothing in return. This is a beautiful sequence for black and really shows how strong Shusaku was even at a young age (he is ten at the time of this game).

With 50 white takes the biggest point on the board but this allows black to take the initiative and attack the floating white stones at 51.

Dia. 2

White pushes out through 60 and then builds up the top left with 62 and 64. White switches back to defending his center group with 66 and then ignores black's turn at 67 to play the large point at 68. Black makes an excellent move at 69 which exploits the bad aji at G18, white has to defend the point with 70 or black will play there and cause all kinds of trouble. See if you can work out the details for yourself (hint: Black's wedge at F16 has some intriguing possibilities).

Dia. 3

This takes us through to the end, these moves are all pretty small but notice how Shusaku ignores the threat to cut at 78 to live on the side with 79. This is bigger in terms of territory and makes the cut meaningless. After white blocks at 80 black uses sente very well, forcing at 81, 83, 85, and 87. White resigned after black 91. I'm not the best counter but no matter how I play out the endgame it seems black has a secure lead of at least a couple points.

I hope you enjoyed this game. I had a lot of fun playing through it for you. Maybe we can do another Shusaku game next week. I'll see if I can find a good one, or maybe we'll just go through the book, game by game, and see how Shusaku progresses. Till next time, ciao!