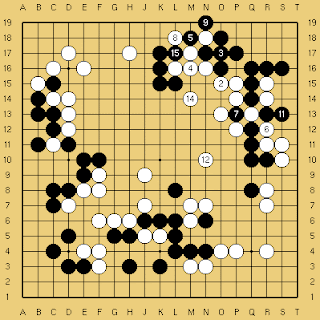
Alright, we'll get through the middle game ko fight in detail and then I should be able to wrap up the game with the next post, thanks for following along so far. Ko can be very confusing so I broke this section down into smaller pieces so we can follow the ko fight closely. If you're just getting here you can jump to the beginning if you want to get up to speed. With that said, lets continue:
Dia. 1
Note that Black 1 = 101
White captures at 94 which reinforces his center stones and threatens to escalate the ko by cutting at R12. Black responds by turning at 95 to pressure white and white attaches at 96 which leads to a second ko, this one, unlike the other ko, is large and urgent. Black captures immediately.
Dia. 2
White 10 to the right of 7.
Black 13 at 7.
As you can see white doesn't even fight the ko but while black captures and then connects with 3 white uses 2 and 4 to link up his stones. Black cuts at 5 and white uses 6 to increase the size of the ko on the right. Black captures and white makes a ko threat at 8. After black captures white retakes the ko with 10. Black defends by falling back at 11 which firmly captures the two stones above. Now if white fills the ko at 7 black's five stones on the right will be cut off. If white fills immediately though black will jump to 12 and escape easily. Therefor white plays at 12 directly even though this allows black to retake the ko with 13. White 14 reinforces his stones and threatens to cut off and attack black's four stones on the top center. Black cuts at 15 to connect underneath to the corner and with 16 white retakes the ko.
Dia. 3
19 takes ko.
26 takes ko.
17 threatens to connect to the endangered stones so white plays 18 to respond and black retakes the ko. White 20 threatens the large black group on the bottom and black 21 is a good response. If white retakes the ko black has very large moves on the bottom and can inflict damage to the white corner in the lower right. The combination of 21, 23, and 25 make it hard to threaten the group effectively and reduce white's ko threats. Compare if black simply blocked 20 at H2 then white would retake the ko and continue to threaten this group. After 25 white retakes the ko. Black pokes at 27 and then takes the ko.
Dia. 4
47 fills ko to the right of 29
White makes a threat at 30 but black makes a very sharp decision to ignore it and attack white's bottom group. If white can build some influence towards the center then the white cut at K18 doesn't matter so much because the five black stones can easily jump to safety. After 31 and 33 white has to struggle to make eyes locally. While white eventually gets a second eye at 46 and does a little damage to the corner but there is no way to live in sente. After 31 and 33 the white threat at 30 is not looking so threatening so black takes sente to fill the ko bringing this fight to a close.
If we look at the end result white has done poorly. White had to invest an extra move at R12 to increase the value of the ko fight and that move becomes wasted now. Secondly when black connects the ko it is white who is suddenly thin in the center and white will have to jump out which will even give black time to turn to the top and answer white's ko threat. This sequence shows the incredible latent strength of Shusaku and his amazing grasp of timing. Usually one can expect to get at least some profit out of a ko fight but here white has gotten almost nothing.
Next time we'll wrap this game up, check back for the rest of the analysis.


No comments:
Post a Comment